Properties (Path)
[Function] - [Touch]
| [Operation] |
| [Type] |
Select an operation to execute by touching the object. -[None] -[Bit] -[Word] -[String] -[Screen Change] -[Content Change] |
When selecting [Bit]When selecting [Bit]
Select the operation type.
| [Operation] | Description |
| [Set] | Turns ON the specified boolean source property in the [Destination]. |
| [Reset] | Turns OFF the specified boolean source property in the [Destination]. |
| [Toggle] | Switches from ON/OFF or vice versa based on the specified
boolean source property.
|
[Momentary ON] |
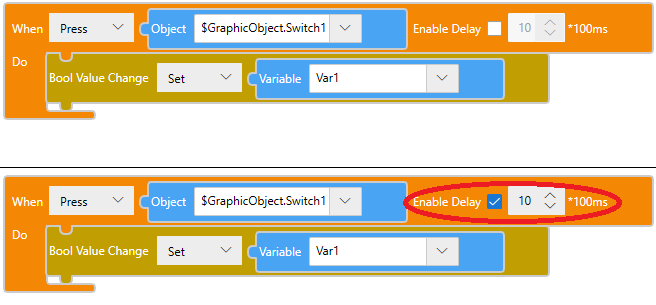
Turns ON the specified boolean source property while the object is pressed, and turns OFF the boolean source property when the object is released. You can add a delay with the [Enable Delay] property below. |
| [Momentary OFF] | Turns OFF the specified boolean source property while the object is pressed, and turns ON the boolean source property when the object is released. You can add a delay with the [Enable Delay] property below. |
| [Enable Delay] | Used with Momentary ON and Momentary OFF operations, defines
the amount of time the object must be pressed until the boolean
source property is turned either ON or OFF. Specify the delay
time in units of 100 milliseconds.
If you want to set a delay after the object is released,
until the boolean source property is turned either ON
or OFF, you cannot use this setting. Instead, draw a switch
and create a script as follows. |
When selecting [Word]When selecting [Word]
Select the operation type.
| [Operation] | Description |
| [Set] | Writes the source property or constant specified in the [Source] to the source property specified in the [Destination] field and copies the result to the destination source property. |
| [Add] | Adds the source property or constant specified in the [Source] to the source property specified in the [Destination] field and copies the result to the destination source property. |
| [Subtract] | Subtracts the source property or constant specified in the [Source] from the source property specified in the [Destination] field and copies the result to the destination source property. |
| [Multiplication] | Multiplies the source property or constant specified in the [Source] by the source property specified in the [Destination] and copies the result to the destination source property. |
| [Division] | Divides the source property or constant specified in the [Source] by the source property specified in the [Destination] and copies the result to the destination source property. |
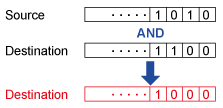
| [AND] | Runs an AND operation (Bitwise AND) between the integer
or source property specified in the [Source] with the source
property specified in the [Destination] field and then copies
the result to the destination source property.
 |
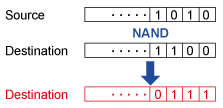
| [NAND] | Runs the NAND operation (logical product followed by NOT)
between the integer or source property specified in the [Source]
and the source property specified in the [Destination] and
copies the result to the destination source property.
 |
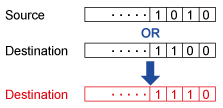
| [OR] | Writes the OR value (logical sum) of the integer or source
property specified in the [Source] and the source property
specified in the [Destination] and copies the result to the
destination source property.
 |
| [NOR] | Writes the NOR value (logical sum followed by Inverter)
of the integer or source property specified in the [Source]
and the source property specified in the [Destination] and
copies the result to the destination source property.
 |
| [XOR] | Writes the XOR value (exclusive logical sum) of the integer
or source property specified in the [Source] and the source
property specified in the [Destination] and copies the result
to the destination source property.
 |
When selecting [String]When selecting [String]
Select the operation type.
| [Operation] | Description |
| [Set] | Writes the source property or constant specified in the [Source] to the source property specified in the [Destination] and copies the result to the destination source property. |
| [ConCatenate] | Writes the source property or constant specified in the [Source] to the source property specified in the [Destination] and combines the result to the destination source property. |
When selecting [Screen Change]When selecting [Screen Change]
Select the operation type.
| [Previous] | Return to the previous screen |
| [Specific ID] | Change the specific screen ID specified in the [Screen] |
When selecting [Content Change]When selecting [Content Change]
Select the operation type.
| [Previous] | Return to the previous content |
| [Specific ID] | Change the specific content ID specified in the [Content] |
[Function] - [Detail]
| [Interlock] '(object name).Interlock' |
Assign the boolean type source property. When the assigned source property value is True, object touch is disabled. |
Data Binding Support: To use as a Binding Source, refer to the
following. When used as a Binding Target, the Binding
Sources that can be associated are as follows. For more information of Data Binding concept,
refer to the following. |
 Alarm] [
 Variable] [
 Local Variable] [
 Graphical Object] [
 Target] [
 Equipment] [
 Recipe]
| [Security Level] |
Set the security level for the object. When touching the object, touch operations are enabled when the operator's security level is equal to or greater than the security level specified here. Setting Value Range:0 - 65535 |
| [Operation Log] |
When [Alarm/Events]→[Operation Log]→[Object Touch] is disabled, select the [Operation Log] option to record the user that operated the object. |
For more information about Operation Log, refer to the following. |
| [Beep Type] |
|
Select the sound of the buzzer on touch. -[None]: No Beep. -[One shot]: Beeps once. -[Continuous]: Beeps continuously. -[Periodic]: Beeps at a regular interval. |
| [Press Effect] |
| [Shift] |
When Switch is pressed, the switch moves to the right by 4 pixels and down by 4 pixels. |
|
[Shape] - [Basic]
| [Fill] |
| Set fill color. |
| [Type] |
Select how to display colors. -[None]: Display no color. -[Solid]: Display a solid color. -[Pattern]: Display two colors in a pattern. -[Linear Gradient]: Change color gradually from one end of the object to the other. -[Radial Gradient]: Change color gradually from the center point. -[Blink]: Alternate between 2 colors. |
When selecting [Solid]When selecting [Solid]
| [Color] |
| [Value] '(object name).Fill.Color.Value' / '(object name).Fill.Color.ColorIndexEnabled' |
| Set the display color. To the right of the item name is the current display color. Click the display color to pop up a color palette. Select the color set up method, either [ID] or [RGB], which appears at the top of the color palette. -[ID]: From the color palette, select the display color you want to use. The display color is managed using the ID. While ID numbers are the same between color sets, because the display color depends on the color set, if you change the color set the display color will also change. -[RGB]: Set the display color in RGB format. Either select from the color palette, or enter the RGB value. |
For information about color sets, refer to
the following. Data Binding Support: To use as a Binding Source, refer to the
following. When used as a Binding Target, the Binding
Sources that can be associated are as follows. For more information of Data Binding concept,
refer to the following. |
| [Transparency] '(object name).Fill.Color.Transparency' |
Set the transparency level of the display color. Setting Value Range: 0 - 100 |
Data Binding Support: To use as a Binding Source, refer to the
following. When used as a Binding Target, the Binding
Sources that can be associated are as follows. For more information of Data Binding concept,
refer to the following. |
When selecting [Pattern]When selecting [Pattern]
| [Pattern] |
Select the pattern for the display colors. |
| [Color] |
| [Value] '(object name).Fill.ForeColor.Value' / '(object name).Fill.ForeColor.ColorIndexEnabled' '(object name).Fill.BackColor.Value' / '(object name).Fill.BackColor.ColorIndexEnabled' |
| Set the display color. To the right of the item name is the current display color. Click the display color to pop up a color palette. Select the color set up method, either [ID] or [RGB], which appears at the top of the color palette. -[ID]: From the color palette, select the display color you want to use. The display color is managed using the ID. While ID numbers are the same between color sets, because the display color depends on the color set, if you change the color set the display color will also change. -[RGB]: Set the display color in RGB format. Either select from the color palette, or enter the RGB value. |
Data Binding Support: To use as a Binding Source, refer to the
following. '(object name).Fill.BackColor.Value' / '(object name).Fill.BackColor.ColorIndexEnabled' When used as a Binding Target, the Binding
Sources that can be associated are as follows. For more information of Data Binding concept,
refer to the following. |
| [Transparency] '(object name).Fill.ForeColor.Transparency' / '(object name).Fill.BackColor.Transparency' |
Set the transparency level of the display color. Setting Value Range: 0 - 100 |
Data Binding Support: To use as a Binding Source, refer to the
following. When used as a Binding Target, the Binding
Sources that can be associated are as follows. For more information of Data Binding concept,
refer to the following. |
When selecting [Linear Gradient]When selecting [Linear Gradient]
| [Angle] |
Set the direction of changes in color. |
| [Color Stops] / [Position (%)] |
Set the position of the selected branch point. Select branch points with the slider on an item. You can also use the slider to move the position of the branch point. Click the + on the right-hand side of the slider to add a branch point. Click x to delete the branch point. |
| [Color] |
Set the display color of the selected branch point.
|
For information about color sets, refer to
the following. |
| [Transparency] |
Set the transparency level of the display color. Setting Value Range: 0 - 100 |
When selecting [Radial Gradient]When selecting [Radial Gradient]
| [Center Position] / [Horizontal Center] / [Vertical Center] |
In [Center Position], select the start position of changes in color. You can use [Horizontal Center] and [Vertical Center] to fine-tune the center position. |
| [Position (%)] |
Set the position of the selected branch point. Select branch points with the slider on an item. You can also use the slider to move the position of the branch point. Click the + on the right-hand side of the slider to add a branch point. Click x to delete the branch point. |
| [Color] |
Set the display color of the selected branch point.
|
For information about color sets, refer to
the following. |
| [Transparency] |
Set the transparency level of the display color. Setting Value Range: 0 - 100 |
When selecting [Blink]When selecting [Blink]
| [Speed] |
Select the speed at which the two display colors switch. |
| [Color] |
| [Value] '(object name).Fill.Color1.Value' / '(object name).Fill.Color1.ColorIndexEnabled' '(object name).Fill.Color2.Value' / '(object name).Fill.Color2.ColorIndexEnabled' |
| Set the display color. To the right of the item name is the current display color. Click the display color to pop up a color palette. Select the color set up method, either [ID] or [RGB], which appears at the top of the color palette. -[ID]: From the color palette, select the display color you want to use. The display color is managed using the ID. While ID numbers are the same between color sets, because the display color depends on the color set, if you change the color set the display color will also change. -[RGB]: Set the display color in RGB format. Either select from the color palette, or enter the RGB value. |
For information about color sets, refer to
the following. Data Binding Support: To use as a Binding Source, refer to the
following. '(object name).Fill.Color2.Value' / '(object name).Fill.Color2.ColorIndexEnabled' When used as a Binding Target, the Binding
Sources that can be associated are as follows. For more information of Data Binding concept,
refer to the following. |
| [Transparency] '(object name).Fill.Color1.Transparency' / '(object name).Fill.Color2.Transparency' |
Set the transparency level of the display color. Setting Value Range: 0 - 100 |
Data Binding Support: To use as a Binding Source, refer to the
following. When used as a Binding Target, the Binding
Sources that can be associated are as follows. For more information of Data Binding concept,
refer to the following. |
| [Border] |
| Set border color. |
| [Type] |
Select how to display colors. -[None]: Display no color. -[Solid]: Display a solid color. -[Pattern]: Display two colors in a pattern. -[Linear Gradient]: Change color gradually from one end of the object to the other. -[Radial Gradient]: Change color gradually from the center point. -[Blink]: Alternate between 2 colors. |
When selecting [Solid]When selecting [Solid]
| [Color] |
| [Value] '(object name).Border.Color.Value' / '(object name).Border.Color.ColorIndexEnabled' |
| Set the display color. To the right of the item name is the current display color. Click the display color to pop up a color palette. Select the color set up method, either [ID] or [RGB], which appears at the top of the color palette. -[ID]: From the color palette, select the display color you want to use. The display color is managed using the ID. While ID numbers are the same between color sets, because the display color depends on the color set, if you change the color set the display color will also change. -[RGB]: Set the display color in RGB format. Either select from the color palette, or enter the RGB value. |
For information about color sets, refer to
the following. Data Binding Support: To use as a Binding Source, refer to the
following. When used as a Binding Target, the Binding
Sources that can be associated are as follows. For more information of Data Binding concept,
refer to the following. |
| [Transparency] '(object name).Border.Color.Transparency' |
Set the transparency level of the display color. Setting Value Range: 0 - 100 |
Data Binding Support: To use as a Binding Source, refer to the
following. When used as a Binding Target, the Binding
Sources that can be associated are as follows. For more information of Data Binding concept,
refer to the following. |
When selecting [Pattern]When selecting [Pattern]
| [Pattern] |
Select the pattern for the display colors. |
| [Color] |
| [Value] '(object name).Border.ForeColor.Value' / '(object name).Border.ForeColor.ColorIndexEnabled' '(object name).Border.BackColor.Value' / '(object name).Border.BackColor.ColorIndexEnabled' |
| Set the display color. To the right of the item name is the current display color. Click the display color to pop up a color palette. Select the color set up method, either [ID] or [RGB], which appears at the top of the color palette. -[ID]: From the color palette, select the display color you want to use. The display color is managed using the ID. While ID numbers are the same between color sets, because the display color depends on the color set, if you change the color set the display color will also change. -[RGB]: Set the display color in RGB format. Either select from the color palette, or enter the RGB value. |
For information about color sets, refer to
the following. Data Binding Support: To use as a Binding Source, refer to the
following. '(object name).Border.BackColor.Value' / '(object name).Border.BackColor.ColorIndexEnabled' When used as a Binding Target, the Binding
Sources that can be associated are as follows. For more information of Data Binding concept,
refer to the following. |
| [Transparency] '(object name).Border.ForeColor.Transparency' / '(object name).Border.BackColor.Transparency' |
Set the transparency level of the display color. Setting Value Range: 0 - 100 |
Data Binding Support: To use as a Binding Source, refer to the
following. When used as a Binding Target, the Binding
Sources that can be associated are as follows. For more information of Data Binding concept,
refer to the following. |
When selecting [Linear Gradient]When selecting [Linear Gradient]
| [Angle] |
Set the direction of changes in color. |
| [Color Stops] / [Position (%)] |
Set the position of the selected branch point. Select branch points with the slider on an item. You can also use the slider to move the position of the branch point. Click the + on the right-hand side of the slider to add a branch point. Click x to delete the branch point. |
| [Color] |
Set the display color of the selected branch point.
|
For information about color sets, refer to
the following. |
| [Transparency] |
Set the transparency level of the display color. Setting Value Range: 0 - 100 |
When selecting [Radial Gradient]When selecting [Radial Gradient]
| [Center Position] / [Horizontal Center] / [Vertical Center] |
In [Center Position], select the start position of changes in color. You can use [Horizontal Center] and [Vertical Center] to fine-tune the center position. |
| [Position (%)] |
Set the position of the selected branch point. Select branch points with the slider on an item. You can also use the slider to move the position of the branch point. Click the + on the right-hand side of the slider to add a branch point. Click x to delete the branch point. |
| [Color] |
Set the display color of the selected branch point.
|
For information about color sets, refer to
the following. |
| [Transparency] |
Set the transparency level of the display color. Setting Value Range: 0 - 100 |
When selecting [Blink]When selecting [Blink]
| [Speed] |
Select the blink speed for the display color. |
| [Color] |
| [Value] '(object name).Border.Color1.Value' / '(object name).Border.Color1.ColorIndexEnabled' '(object name).Border.Color2.Value' / '(object name).Border.Color2.ColorIndexEnabled' |
| Set the display color. To the right of the item name is the current display color. Click the display color to pop up a color palette. Select the color set up method, either [ID] or [RGB], which appears at the top of the color palette. -[ID]: From the color palette, select the display color you want to use. The display color is managed using the ID. While ID numbers are the same between color sets, because the display color depends on the color set, if you change the color set the display color will also change. -[RGB]: Set the display color in RGB format. Either select from the color palette, or enter the RGB value. |
For information about color sets, refer to
the following. Data Binding Support: To use as a Binding Source, refer to the
following. '(object name).Border.Color2.Value' / '(object name).Border.Color2.ColorIndexEnabled' When used as a Binding Target, the Binding
Sources that can be associated are as follows. For more information of Data Binding concept,
refer to the following. |
| [Transparency] '(object name).Border.Color1.Transparency' / '(object name).Border.Color2.Transparency' |
Set the transparency level of the display color. Setting Value Range: 0 - 100 |
Data Binding Support: To use as a Binding Source, refer to the
following. When used as a Binding Target, the Binding
Sources that can be associated are as follows. For more information of Data Binding concept,
refer to the following. |
| [Border Thickness] '(object name).Thickness' |
Set the line width of the frame. Setting Value Range: 1 - 9 |
Data Binding Support: To use as a Binding Source, refer to the
following. When used as a Binding Target, the Binding
Sources that can be associated are as follows. For more information of Data Binding concept,
refer to the following. |
| [Elements] |
| This property is available when [From SVG] is selected. |
| [Element 0], [Element 1]... |
| Set up properties on the object for each element. |
| [ID] |
| Displays the element ID. |
| [Fill] |
| Set fill color. |
| [Type] |
Select how to display colors. -[None]: Display no color. -[Solid]: Display a solid color. -[Pattern]: Display two colors in a pattern. -[Linear Gradient]: Change color gradually from one end of the object to the other. -[Radial Gradient]: Change color gradually from the center point. -[Blink]: Alternate between 2 colors. |
When selecting [Solid]When selecting [Solid]
| [Color] |
| [Value] '(object name).Elements[*].Fill.Color.Value' / '(object name).Elements[*].Fill.Color.ColorIndexEnabled' |
| Set the display color. To the right of the item name is the current display color. Click the display color to pop up a color palette. Select the color set up method, either [ID] or [RGB], which appears at the top of the color palette. -[ID]: From the color palette, select the display color you want to use. The display color is managed using the ID. While ID numbers are the same between color sets, because the display color depends on the color set, if you change the color set the display color will also change. -[RGB]: Set the display color in RGB format. Either select from the color palette, or enter the RGB value. |
|
For information about color sets, refer to
the following. Data Binding Support: To use as a Binding Source, refer to the
following. When used as a Binding Target, the Binding
Sources that can be associated are as follows. For more information of Data Binding concept,
refer to the following. |
| [Transparency] '(object name).Elements[*].Fill.Color.Transparency' |
|
Set the transparency level of the display color. Setting Value Range: 0 - 100 |
|
Data Binding Support: To use as a Binding Source, refer to the
following. When used as a Binding Target, the Binding
Sources that can be associated are as follows. For more information of Data Binding concept,
refer to the following. |
When selecting [Pattern]When selecting [Pattern]
| [Pattern] |
|
Select the pattern for the display colors. |
| [Color] |
| [Value] '(object name).Elements[*].Fill.ForeColor.Value' / '(object name).Elements[*].Fill.ForeColor.ColorIndexEnabled' '(object name).Elements[*].Fill.BackColor.Value' / '(object name).Elements[*].Fill.BackColor.ColorIndexEnabled' |
| Set the display color. To the right of the item name is the current display color. Click the display color to pop up a color palette. Select the color set up method, either [ID] or [RGB], which appears at the top of the color palette. -[ID]: From the color palette, select the display color you want to use. The display color is managed using the ID. While ID numbers are the same between color sets, because the display color depends on the color set, if you change the color set the display color will also change. -[RGB]: Set the display color in RGB format. Either select from the color palette, or enter the RGB value. |
|
Data Binding Support: To use as a Binding Source, refer to the
following. '(object name).Elements[*].Fill.BackColor.Value' / '(object name).Elements[*].Fill.BackColor.ColorIndexEnabled' When used as a Binding Target, the Binding
Sources that can be associated are as follows. For more information of Data Binding concept,
refer to the following. |
| [Transparency] '(object name).Elements[*].Fill.ForeColor.Transparency' / '(object name).Elements[*].Fill.BackColor.Transparency' |
|
Set the transparency level of the display color. Setting Value Range: 0 - 100 |
|
Data Binding Support: To use as a Binding Source, refer to the
following. When used as a Binding Target, the Binding
Sources that can be associated are as follows. For more information of Data Binding concept,
refer to the following. |
When selecting [Linear Gradient]When selecting [Linear Gradient]
| [Angle] |
Set the direction of changes in color. |
| [Color Stops] / [Position (%)] |
Set the position of the selected branch point. Select branch points with the slider on an item. You can also use the slider to move the position of the branch point. Click the + on the right-hand side of the slider to add a branch point. Click x to delete the branch point. |
| [Color] |
Set the display color of the selected branch point.
|
For information about color sets, refer to
the following. |
| [Transparency] |
Set the transparency level of the display color. Setting Value Range: 0 - 100 |
When selecting [Radial Gradient]When selecting [Radial Gradient]
| [Center Position] / [Horizontal Center] / [Vertical Center] |
In [Center Position], select the start position of changes in color. You can use [Horizontal Center] and [Vertical Center] to fine-tune the center position. |
| [Position (%)] |
Set the position of the selected branch point. Select branch points with the slider on an item. You can also use the slider to move the position of the branch point. Click the + on the right-hand side of the slider to add a branch point. Click x to delete the branch point. |
| [Color] |
Set the display color of the selected branch point.
|
For information about color sets, refer to
the following. |
| [Transparency] |
Set the transparency level of the display color. Setting Value Range: 0 - 100 |
When selecting [Blink]When selecting [Blink]
| [Speed] |
|
Select the speed at which the two display colors switch. |
| [Color] |
| [Value] '(object name).Elements[*].Fill.Color1.Value' / '(object name).Elements[*].Fill.Color1.ColorIndexEnabled' '(object name).Elements[*].Fill.Color2.Value' / '(object name).Elements[*].Fill.Color2.ColorIndexEnabled' |
| Set the display color. To the right of the item name is the current display color. Click the display color to pop up a color palette. Select the color set up method, either [ID] or [RGB], which appears at the top of the color palette. -[ID]: From the color palette, select the display color you want to use. The display color is managed using the ID. While ID numbers are the same between color sets, because the display color depends on the color set, if you change the color set the display color will also change. -[RGB]: Set the display color in RGB format. Either select from the color palette, or enter the RGB value. |
|
For information about color sets, refer to
the following. Data Binding Support: To use as a Binding Source, refer to the
following. '(object name).Elements[*].Fill.Color2.Value' / '(object name).Elements[*].Fill.Color2.ColorIndexEnabled' When used as a Binding Target, the Binding
Sources that can be associated are as follows. For more information of Data Binding concept,
refer to the following. |
| [Transparency] '(object name).Elements[*].Fill.Color1.Transparency' / '(object name).Elements[*].Fill.Color2.Transparency' |
|
Set the transparency level of the display color. Setting Value Range: 0 - 100 |
|
Data Binding Support: To use as a Binding Source, refer to the
following. When used as a Binding Target, the Binding
Sources that can be associated are as follows. For more information of Data Binding concept,
refer to the following. |
| [Border] |
| Set border color. |
| [Type] |
Select how to display colors. -[None]: Display no color. -[Solid]: Display a solid color. -[Pattern]: Display two colors in a pattern. -[Linear Gradient]: Change color gradually from one end of the object to the other. -[Radial Gradient]: Change color gradually from the center point. -[Blink]: Alternate between 2 colors. |
When selecting [Solid]When selecting [Solid]
| [Color] |
| [Value] '(object name).Elements[*].Border.Color.Value' / '(object name).Border.Color.ColorIndexEnabled' |
| Set the display color. To the right of the item name is the current display color. Click the display color to pop up a color palette. Select the color set up method, either [ID] or [RGB], which appears at the top of the color palette. -[ID]: From the color palette, select the display color you want to use. The display color is managed using the ID. While ID numbers are the same between color sets, because the display color depends on the color set, if you change the color set the display color will also change. -[RGB]: Set the display color in RGB format. Either select from the color palette, or enter the RGB value. |
|
For information about color sets, refer to
the following. Data Binding Support: To use as a Binding Source, refer to the
following. When used as a Binding Target, the Binding
Sources that can be associated are as follows. For more information of Data Binding concept,
refer to the following. |
| [Transparency] '(object name).Elements[*].Border.Color.Transparency' |
|
Set the transparency level of the display color. Setting Value Range: 0 - 100 |
|
Data Binding Support: To use as a Binding Source, refer to the
following. When used as a Binding Target, the Binding
Sources that can be associated are as follows. For more information of Data Binding concept,
refer to the following. |
When selecting [Pattern]When selecting [Pattern]
| [Pattern] |
|
Select the pattern for the display colors. |
| [Color] |
| [Value] '(object name).Elements[*].Border.ForeColor.Value' / '(object name).Elements[*].Border.ForeColor.ColorIndexEnabled' '(object name).Elements[*].Border.BackColor.Value' / '(object name).Elements[*].Border.BackColor.ColorIndexEnabled' |
| Set the display color. To the right of the item name is the current display color. Click the display color to pop up a color palette. Select the color set up method, either [ID] or [RGB], which appears at the top of the color palette. -[ID]: From the color palette, select the display color you want to use. The display color is managed using the ID. While ID numbers are the same between color sets, because the display color depends on the color set, if you change the color set the display color will also change. -[RGB]: Set the display color in RGB format. Either select from the color palette, or enter the RGB value. |
|
For information about color sets, refer to
the following. Data Binding Support: To use as a Binding Source, refer to the
following. '(object name).Elements[*].Border.BackColor.Value' / '(object name).Elements[*].Border.BackColor.ColorIndexEnabled' When used as a Binding Target, the Binding
Sources that can be associated are as follows. For more information of Data Binding concept,
refer to the following. |
| [Transparency] '(object name).Elements[*].Border.ForeColor.Transparency' / '(object name).Elements[*].Border.BackColor.Transparency' |
|
Set the transparency level of the display color. Setting Value Range: 0 - 100 |
|
Data Binding Support: To use as a Binding Source, refer to the
following. When used as a Binding Target, the Binding
Sources that can be associated are as follows. For more information of Data Binding concept,
refer to the following. |
When selecting [Linear Gradient]When selecting [Linear Gradient]
| [Angle] |
Set the direction of changes in color. |
| [Color Stops] / [Position (%)] |
Set the position of the selected branch point. Select branch points with the slider on an item. You can also use the slider to move the position of the branch point. Click the + on the right-hand side of the slider to add a branch point. Click x to delete the branch point. |
| [Color] |
Set the display color of the selected branch point.
|
For information about color sets, refer to
the following. |
| [Transparency] |
Set the transparency level of the display color. Setting Value Range: 0 - 100 |
When selecting [Radial Gradient]When selecting [Radial Gradient]
| [Center Position] / [Horizontal Center] / [Vertical Center] |
In [Center Position], select the start position of changes in color. You can use [Horizontal Center] and [Vertical Center] to fine-tune the center position. |
| [Position (%)] |
Set the position of the selected branch point. Select branch points with the slider on an item. You can also use the slider to move the position of the branch point. Click the + on the right-hand side of the slider to add a branch point. Click x to delete the branch point. |
| [Color] |
Set the display color of the selected branch point.
|
For information about color sets, refer to
the following. |
| [Transparency] |
Set the transparency level of the display color. Setting Value Range: 0 - 100 |
When selecting [Blink]When selecting [Blink]
| [Speed] |
|
Select the blink speed for the display color. |
| [Color] |
| [Value] '(object name).Elements[*].Border.Color1.Value' / '(object name).Elements[*].Border.Color1.ColorIndexEnabled' '(object name).Elements[*].Border.Color2.Value' / '(object name).Elements[*].Border.Color2.ColorIndexEnabled' |
| Set the display color. To the right of the item name is the current display color. Click the display color to pop up a color palette. Select the color set up method, either [ID] or [RGB], which appears at the top of the color palette. -[ID]: From the color palette, select the display color you want to use. The display color is managed using the ID. While ID numbers are the same between color sets, because the display color depends on the color set, if you change the color set the display color will also change. -[RGB]: Set the display color in RGB format. Either select from the color palette, or enter the RGB value. |
|
For information about color sets, refer to
the following. Data Binding Support: To use as a Binding Source, refer to the
following. '(object name).Elements[*].Border.Color2.Value' / '(object name).Elements[*].Border.Color2.ColorIndexEnabled' When used as a Binding Target, the Binding
Sources that can be associated are as follows. For more information of Data Binding concept,
refer to the following. |
| [Transparency] '(object name).Elements[*].Border.Color1.Transparency' / '(object name).Elements[*].Border.Color2.Transparency' |
|
Set the transparency level of the display color. Setting Value Range: 0 - 100 |
|
Data Binding Support: To use as a Binding Source, refer to the
following. When used as a Binding Target, the Binding
Sources that can be associated are as follows. For more information of Data Binding concept,
refer to the following. |
| [Border Thickness] '(object name).Elements[*].Thickness' |
|
Set the line width of the frame. Setting Value Range: 1 - 9 |
|
Data Binding Support: To use as a Binding Source, refer to the
following. When used as a Binding Target, the Binding
Sources that can be associated are as follows. For more information of Data Binding concept,
refer to the following. |
| [Path Data] |
Click the  icon to open the [Path Editor]. Design the path object using a path string or text. icon to open the [Path Editor]. Design the path object using a path string or text. |
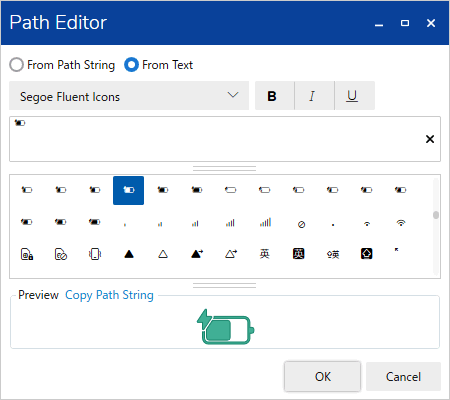
| [Path Editor] |
|
Define how the path object is designed. Select either [From Path String] or [From Text]. The path string is erased when you change the [Path Editor] from [From Path String] to [From Text]. When you change from [From Text] to [From Path String], the path string is constructed based on the text. |
| [From Path String] |
|
Use a path string to design the path object. Enter a path string in the input field or paste a copied path string.
|
| [From Text] |
|
Use text to design the path object. Select the font type and attributes, then enter text in the input field. You can also enter text in the input field by clicking on the character in the Character map. Example:
You can enter up to 512 characters. Word wrap is supported for text input.
|
| [From SVG] | |||||||||||||||||||||||||||||||||||||
|
Use an SVG file to design the path object. Click the ellipsis [...] to select the file.
Supported SVG Elements and Attributes
Supported SVG Presentation Attribute
|
| [Original] |
|
This property is available when [From SVG] is selected. The SVG file is rendered the same way as in a web browser. |
| [Preview] |
|
This field displays a preview of the path object. If there is a syntax error, the preview is unavailable. |
| [Transparency] '(object name).Transparency' |
Set the whole object’s color transparency. Setting Value Range: 0 - 100 |
When transparency is set for display colors, it results in higher transparency as it is applied to both colors. Data Binding Support: To use as a Binding Source, refer to the
following. When used as a Binding Target, the Binding
Sources that can be associated are as follows. For more information of Data Binding concept,
refer to the following. |
| [Shadow] |
| Set font shadow color. |
| [Vertical Thickness] / [Horizontal Thickness] |
Set the distance between an object and its shadow. Setting Value Range: 0 - 100 |
| [Color] |
| [Value] '(object name).Shadow.Color.Value' / '(object name).Shadow.Color.ColorIndexEnabled' |
| Set the display color. To the right of the item name is the current display color. Click the display color to pop up a color palette. Select the color set up method, either [ID] or [RGB], which appears at the top of the color palette. -[ID]: From the color palette, select the display color you want to use. The display color is managed using the ID. While ID numbers are the same between color sets, because the display color depends on the color set, if you change the color set the display color will also change. -[RGB]: Set the display color in RGB format. Either select from the color palette, or enter the RGB value. |
For information about color sets, refer to
the following. Data Binding Support: To use as a Binding Source, refer to the
following. When used as a Binding Target, the Binding
Sources that can be associated are as follows. For more information of Data Binding concept,
refer to the following. |
| [Transparency] '(object name).Shadow.Color.Transparency' |
Set the transparency level of the display color. Setting Value Range: 0 - 100 |
Data Binding Support: To use as a Binding Source, refer to the
following. When used as a Binding Target, the Binding
Sources that can be associated are as follows. For more information of Data Binding concept,
refer to the following. |
[Shape] - [Size/Location]
| [Location] |
| [Left] / [Top] '(object name).Location.Left' / '(object name).Location.Top' |
Specify the coordinates of the object’s top-left border. The top-left part of the drawing screen is the start point for coordinates. Setting Value Range: -5000 - 10000 |
Set when drawing objects away from Grid, Scroll Grid, Uniform Grid, Dock Panel, and Stack Panel coordinates. Data Binding Support: To use as a Binding Source, refer to the
following. When used as a Binding Target, the Binding
Sources that can be associated are as follows. For more information of Data Binding concept,
refer to the following. |
| [Row] / [Column] '(object name).Location.Row' / '(object name).Location.Column' |
Set the location of an object to place with row and column
numbers. Setting Value Range: 0 - 100 |
Set when placing objects in a Grid or Scroll Grid. Data Binding Support: To use as a Binding Source, refer to the
following. When used as a Binding Target, the Binding
Sources that can be associated are as follows. For more information of Data Binding concept,
refer to the following. |
| [Row Span] / [Column Span] '(object name).Location.RowSpan' / '(object name).Location.ColumnSpan' |
Set the row span or column span when you want to place an object on multiple rows and/or columns. Setting Value Range: 1 - 100 |
Set when placing objects in a Grid or Scroll Grid. Data Binding Support: To use as a Binding Source, refer to the
following. When used as a Binding Target, the Binding
Sources that can be associated are as follows. For more information of Data Binding concept,
refer to the following. |
| [Dock] '(object name).Location.Dock' |
Select the direction where you want to dock the object. |
(The value in brackets represents the value of the source property.) -[Left] (0) -[Top] (1) -[Right] (2) -[Bottom] (3) Setting Value Range: 0 - 3 Data Binding Support: To use as a Binding Source, refer to the
following. When used as a Binding Target, the Binding
Sources that can be associated are as follows. For more information of Data Binding concept,
refer to the following. |
| [Width] / [Height] '(object name).Width' / '(object name).Height' |
Set the object width and height. Setting Value Range: 1 - 5000 |
When placing objects on a Grid, Scroll Grid, or Uniform Grid, in order for the object to line up with grid borders, use the width and height default values. Data Binding Support: To use as a Binding Source, refer to the
following.
Note that if the width and height remain as their default values, the value
of the Binding Source is 0. When used as a Binding Target, the Binding
Sources that can be associated are as follows. For more information of Data Binding concept,
refer to the following. |
| [Angle] |
Set the rotation angle for the object. Set the rotation angle in the clockwise direction. Setting Value Range: -360 - 360 |
| [Margin] |
| [Left] / [Right] / [Top] / [Bottom] |
Set the margins on the object. [Margin] settings depend on [Object Alignment] and [Width]/[Height] settings. This setting works together with [Object Alignment]. Setting Value Range: -1000 - 1000 |
The margin is not part of the object area. Touching its margin is not the same as touching the object. |
| [Object Alignment] |
| [Horizontal] |
Select the horizontal alignment option. When the object is on [Canvas], [Scroll Canvas], [Zoom Canvas], [View Box], this setting does not work. -[Left]: The object are left-aligned with respect to the
drawing target. The object position shifts right by the numerical
value set in [Left] margin. [Right] margin is ignored. |
When object [Width] is set as default value (value are set in brackets), object alignment is same as [Stretch] even when you select other option than [Stretch]. |
| [Vertical] |
Select the vertical alignment option. When the object is
on [Canvas], [Scroll Canvas], [Zoom Canvas], [View Box], this
setting does not work. |
When object [Height] is set as default value (value are set in brackets), object alignment is same as [Stretch] even when you select other option than [Stretch]. |
| [Animation] |
| [Horizontal Offset] / [Vertical Offset] '(object name).Animation.HorizontalOffset' / '(object name).Animation.VerticalOffset' |
Set the value to move the object in horizontal or vertical
direction. Setting Value Range: -5000 - 10000 |
Data Binding Support: To use as a Binding Source, refer to the
following. When used as a Binding Target, the Binding
Sources that can be associated are as follows. For more information of Data Binding concept,
refer to the following. |
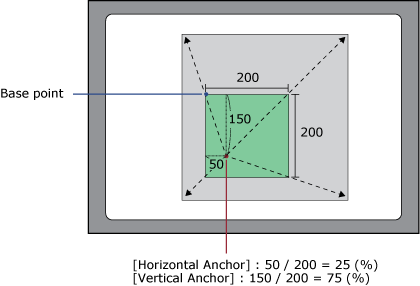
| [Horizontal Anchor] / [Vertical Anchor] '(object name).Animation.HorizontalAnchor' / '(object name).Animation.VerticalAnchor' |
Set the origin point (X/Y axis) of the object that is scaled
up/down. Setting Value Range: 0 - 100 |
When [Horizontal Anchor] = 25 and [Vertical Anchor] = 75, the base point is as shown below.
Data Binding Support: To use as a Binding Source, refer to the
following. When used as a Binding Target, the Binding
Sources that can be associated are as follows. For more information of Data Binding concept,
refer to the following. |
| [Horizontal Scale] / [Vertical Scale] '(object name).Animation.HorizontalScale' / '(object name).Animation.VerticalScale' |
Set the percentage of object after scaling up or down. Setting Value Range: -32768 - 32767 |
Data Binding Support: To use as a Binding Source, refer to the
following. When used as a Binding Target, the Binding
Sources that can be associated are as follows. For more information of Data Binding concept,
refer to the following. |
| [Rotation Center (X)] / [Rotation Center (Y)] '(object name).Animation.RotationCenterX' / '(object name).Animation.RotationCenterY' |
Set the rotation center (X/Y axis) for the object. Setting Value Range: -1000 - 1000 |
When [Rotation Center (X)] = 50, and [Rotation Center (Y)] = 500, the rotation center is as shown below.
0 is the left or top side of the object, and 100 is the right or bottom side of the object. Data Binding Support: To use as a Binding Source, refer to the
following. When used as a Binding Target, the Binding
Sources that can be associated are as follows. For more information of Data Binding concept,
refer to the following. |

| [Rotation Angle] '(object name).Animation.RotationAngle' |
Set the rotation angle for the object. Setting Value Range: -32768 - 32767 |
Data Binding Support: To use as a Binding Source, refer to the
following. When used as a Binding Target, the Binding
Sources that can be associated are as follows. For more information of Data Binding concept,
refer to the following. |
| [Fill Level] |
| [Horizontal Fill] '(object name).Animation.FillLevel.HorizontalFill' |
Set the percentage for the object's horizontal fill. Setting Value Range:
From [Horizontal Start Point] when [Center One Side] is selected:
-100 |
Data Binding Support: To use as a Binding Source, refer to the
following. When used as a Binding Target, the Binding
Sources that can be associated are as follows. For more information of Data Binding concept,
refer to the following. |
| [Horizontal Start Point] |
Select the start point for the fill. -[Left]: The left side of the object is the fill start point. As the value in [Horizontal Fill] increases, the object fills towards the right. -[Right]: The right side of the object is the fill start point. As the value in [Horizontal Fill] increases, the object fills towards the left. -[Center One Side]: The center of the object is the fill start point. As the value in [Horizontal Fill] increases, the object fills towards right; and as the value decreases, the object fills towards the left. -[Center Both Side]: The center of the object is the fill start point. As the value in [Horizontal Fill] increases, the object fills towards both the right and left. |
| [Vertical Fill] '(object name).Animation.FillLevel.VerticalFill' |
Set the percentage for the object's vertical fill. Setting Value Range:
From [Vertical Start Point] when [Middle One Side] is selected:
-100 |
Data Binding Support: To use as a Binding Source, refer to the
following. When used as a Binding Target, the Binding
Sources that can be associated are as follows. For more information of Data Binding concept,
refer to the following. |
| [Vertical Start Point] |
Select the start point for the fill. -[Top]: The top of the object is the fill start point. As the value in [Vertical Fill] increases, the object fills towards the bottom. -[Bottom]: The bottom of the object is the fill start point. As the value in [Vertical Fill] increases, the object fills towards the top. -[Middle One Side]: The middle of the object is the fill start point. As the value in [Vertical Fill] increases, the object fills towards the top; and as the value decreases, the object fills towards the bottom. -[Middle Both Side]: The middle of the object is the fill start point. As the value in [Vertical Fill] increases, the object fills towards both the top and bottom. |
| [Back Color] |
| [Value] '(object name).Animation.FillLevel.BackColor.Color.Value' / '(object name).Animation.FillLevel.BackColor.Color.ColorIndexEnabled' |
| Set the display color. To the right of the item name is the current display color. Click the display color to pop up a color palette. Select the color set up method, either [ID] or [RGB], which appears at the top of the color palette. -[ID]: From the color palette, select the display color you want to use. The display color is managed using the ID. While ID numbers are the same between color sets, because the display color depends on the color set, if you change the color set the display color will also change. -[RGB]: Set the display color in RGB format. Either select from the color palette, or enter the RGB value. |
For information about color sets, refer to
the following. Data Binding Support: To use as a Binding Source, refer to the
following. When used as a Binding Target, the Binding
Sources that can be associated are as follows. For more information of Data Binding concept,
refer to the following. |
| [Transparency] '(object name).Animation.FillLevel.BackColor.Color.Transparency' |
Set the transparency level of the display color. Setting Value Range: 0 - 100 |
Data Binding Support: To use as a Binding Source, refer to the
following. When used as a Binding Target, the Binding
Sources that can be associated are as follows. For more information of Data Binding concept,
refer to the following. |
| [Visibility] '(object name).Visibility' |
Select the visibility state of the object. -[Visible] (0): Display the object. -[Hidden] (1): Hide the object. The object area is maintained. -[Collapsed] (2): Collapse the object. The object area is also collapsed. You can dynamically change the screen layout by collapsing objects on the Uniform Grid, Stack Panel, or Dock Panel. Setting Value Range: 0 - 2 |
Data Binding Support: To use as a Binding Source, refer to the
following. When used as a Binding Target, the Binding
Sources that can be associated are as follows. For more information of Data Binding concept,
refer to the following. |