Properties (Numeric Display)
[Function] - [Basic]
| [Current Value] '(object name).CurrentValue' |
Set the source property for the numeric value to display. On the right-hand side of the field, click the box to select the type of source property. |
Data Binding Support: To use as a Binding Source, refer to the
following. When used as a Binding Target, the Binding
Sources that can be associated are as follows. For more information of Data Binding concept,
refer to the following. |
 Alarm] [
 Variable] [
 Local Variable] [
 Graphical Object] [
 Target] [
 Equipment] [
 Recipe]
| [Format] |
Select the type of data to be displayed. |
When, in the [Current Value], a source property is assigned and either [Unit], [Scale], or [Expression] converter is used, [Format] is fixed as [FloatFixed] regardless of setting. |
| [Integer Digits] |
Set the number of digits for the integer portion of the
displayed value. If the number of digits in the value exceeds
the number set here, the entire value will display regardless
of the set value. |
Setting Value Range: The number of digits you can set depends on the selected [Format]. Refer to the following. When [FloatFixed] or [FloatAuto] is selected for the [Format], the total number of [Integer Digits] and [Decimal Places] must fall within the ranges below. - [Dec]: 1 to 20 |
| [Decimal Places] |
Used when [Dec], [FloatFixed], [FloatAuto], or [FloatScientific]
is selected in [Format]. Setting Value Range: 0 - 19 |
|
| [Enable Input Mode] '(object name).IsInputModeEnabled' |
Select this check box so you can input data from a keypad or barcode reader. With the [Use Keypad] property you can specify whether to display a keypad in input mode. |
Data Binding Support: To use as a Binding Source, refer to the
following. When used as a Binding Target, the Binding
Sources that can be associated are as follows. For more information of Data Binding concept,
refer to the following. |
[Function] - [Detail]
| [Alarm Colors] |
Used when [Current Value] is set up with a variable that is monitored by an alarm, or a variable with an input range. |
| [Use Alarm Range] |
Change an object’s text color, border color, and fill color
when an alarm occurs. Set the object colors for each alarm type. |
| [Use Input Range] |
Change an object's text color, border color, and fill color when the variable value is out of range. |
When using the [Use Input Range] option, set the text, border, and fill color settings in [Out of Input Range]. When using the [Overwrite Input Range] option, uses the input range specified in the [Overwrite Input Range] property. |
| [Overwrite Input Range] |
Available when [Enable Input Mode] is enabled. |
| [Min Input] / [Max Input] '(object name).InputMin' / '(object name).InputMax' |
Set when [Overwrite Input Range] is enabled. Setting Value Range: Depends on the data range for the source property. |
Data Binding Support: To use as a Binding Source, refer to the
following. When used as a Binding Target, the Binding
Sources that can be associated are as follows. For more information of Data Binding concept,
refer to the following. |
| [Zero Suppress] |
Clear the check box to add "0" at the front of
values to align with the number of digits specified in the [Integer
Digits] property. |
| [Digit Grouping] |
Select this check box to group integer digits with either a symbol or space. Groupings change depending on the selected [Format]. -[Dec] or [BCD]: 3-digit groups separated with commas. -[Hex] or [Bin]: 4-digit groups separated with spaces. -[Oct]: 3-digit groups separated with spaces. -[Other]: No digit grouping. |
| [Display Text as *] |
Available when [Enable Input Mode] is enabled. |
| [Interlock] '(object name).Interlock' |
Assign the boolean type source property. When the assigned source property value is True, object touch is disabled. |
Data Binding Support: To use as a Binding Source, refer to the
following. When used as a Binding Target, the Binding
Sources that can be associated are as follows. For more information of Data Binding concept,
refer to the following. |
| [Security Level] |
Set the security level for the object. When touching the object, touch operations are enabled when the operator's security level is equal to or greater than the security level specified here. Setting Value Range:0 - 65535 |
| [Operation Log] |
When [Alarm/Events]→[Operation Log]→[Object Touch] is disabled, select the [Operation Log] option to record the user that operated the object. |
For more information about Operation Log, refer to the following. |
| [Beep Type] |
|
Select the sound of the buzzer on touch. -[None]: No Beep. -[One shot]: Beeps once. -[Continuous]: Beeps continuously. -[Periodic]: Beeps at a regular interval. |
| [Use Keypad] '(object name).UseKeypad’ |
| Display a keypad in input mode. When you want to input using a method other than touching a keypad, such as inputting with a barcode reader, disable this setting so a keypad does not display on the screen in input mode. |
Data Binding Support: To use as a Binding Source, refer to the
following. When used as a Binding Target, the Binding
Sources that can be associated are as follows. For more information of Data Binding concept,
refer to the following. |
| [Prefix] / [Suffix] '(object name).Prefix' / '(object name).Suffix' | ||||||||||||||||||||||||||||
Display text in front of values and after values by entering the prefix or suffix text. You can also enter the text in Rich Text format. |
||||||||||||||||||||||||||||
Example 1
Example 2
Data Binding Support: To use as a Binding Source, refer to the
following. When used as a Binding Target, the Binding
Sources that can be associated are as follows. For more information of Data Binding concept,
refer to the following. |
 LanguageTable Text] [
 LanguageTable
Id] [
LanguageTable
Id] [ Language Table Local Id]
[
Language Table Local Id]
[| [Color When Selected] | |||||||||
Specify the reversal method when an object is selected. |
|||||||||
| -[Reverse Color]: When the object is selected at run time,
colors are flipped. The [Font Color] is applied to the [Fill],
and the [Fill] color is applied to the [Font Color].
-[Reverse Color & Transparency]: When the object is selected at run time, colors and transparency are flipped. The [Font Color] and [Transparency] are applied to the [Fill], and the [Fill] color and [Transparency] are applied to the [Font Color]. When using [Reverse Color] on an object set up with blink on one of either the [Font Color] or [Fill], when the object is selected and colors are flipped, the first transparency setting is applied to the blink colors. Example
|
[Shape] - [Text]
| [Font Color] |
| Set font color. |
| [Type] |
Select how to display colors. -[None]: Display no color. -[Solid]: Display a solid color. -[Blink]: Alternate between 2 colors. |
When selecting [Solid]When selecting [Solid]
| [Color] |
| [Value] '(object name).TextColor.Color.Value' / '(object name).TextColor.Color.ColorIndexEnabled' |
| Set the display color. To the right of the item name is the current display color. Click the display color to pop up a color palette. Select the color set up method, either [ID] or [RGB], which appears at the top of the color palette. -[ID]: From the color palette, select the display color you want to use. The display color is managed using the ID. While ID numbers are the same between color sets, because the display color depends on the color set, if you change the color set the display color will also change. -[RGB]: Set the display color in RGB format. Either select from the color palette, or enter the RGB value. |
For information about color sets, refer to
the following. Data Binding Support: To use as a Binding Source, refer to the
following. When used as a Binding Target, the Binding
Sources that can be associated are as follows. For more information of Data Binding concept,
refer to the following. |
| [Transparency] '(object name).TextColor.Color.Transparency' |
Set the transparency level of the display color. Setting Value Range: 0 - 100 |
Data Binding Support: To use as a Binding Source, refer to the
following. When used as a Binding Target, the Binding
Sources that can be associated are as follows. For more information of Data Binding concept,
refer to the following. |
When selecting [Blink]When selecting [Blink]
| [Speed] |
Select the blink speed for the display color. |
| [Color] |
| [Value] '(object name).TextColor.Color1.Value'
/ '(objectname).TextColor.Color1.ColorIndexEnabled' '(object name).TextColor.Color2.Value' / '(objectname).TextColor.Color2.ColorIndexEnabled' |
| Set the display color. To the right of the item name is the current display color. Click the display color to pop up a color palette. Select the color set up method, either [ID] or [RGB], which appears at the top of the color palette. -[ID]: From the color palette, select the display color you want to use. The display color is managed using the ID. While ID numbers are the same between color sets, because the display color depends on the color set, if you change the color set the display color will also change. -[RGB]: Set the display color in RGB format. Either select from the color palette, or enter the RGB value. |
Data Binding Support: To use as a Binding Source, refer to the
following. '(object name).TextColor.Color2.Value' / '(object name).TextColor.Color2.ColorIndexEnabled' When used as a Binding Target, the Binding
Sources that can be associated are as follows. For more information of Data Binding concept,
refer to the following. |
| [Transparency] '(object name).TextColor.Color1.Transparency' / '(object name).TextColor.Color2.Transparency' |
Set the transparency level of the display color. Setting Value Range: 0 - 100 |
Data Binding Support: To use as a Binding Source, refer to the
following. When used as a Binding Target, the Binding
Sources that can be associated are as follows. For more information of Data Binding concept,
refer to the following. |
| [Font] |
| Configure font settings. |
| [Size] '(object name).Font.Size' |
Set the font size. Setting Value Range: 6 - 512 |
Data Binding Support: To use as a Binding Source, refer to the
following. When used as a Binding Target, the Binding
Sources that can be associated are as follows. For more information of Data Binding concept,
refer to the following. |
| [Type] '(object name).Font.Type' |
Select the language for the font.
|
Data Binding Support: To use as a Binding Source, refer to the
following. When specifying using a source property, the setting value
for items are as follows. When used as a Binding Target, the Binding
Sources that can be associated are as follows. For more information of Data Binding concept,
refer to the following. |
| [Attribute] |
| [Shadow] |
| Set font shadow color. |
| [Color] |
| [Value] '(object name).Font.Attribute.Shadow.Color.Value' / '(object name).Font.Attribute.Shadow.Color.ColorIndexEnabled' |
Set the display color. |
For information about color sets, refer to
the following. Data Binding Support: To use as a Binding Source, refer to the
following. When used as a Binding Target, the Binding
Sources that can be associated are as follows. For more information of Data Binding concept,
refer to the following. |
| [Transparency] '(object name).Font.Attribute.Shadow.Color.Transparency' |
Set the transparency level of the display color. Setting Value Range: 0 - 100 |
Data Binding Support: To use as a Binding Source, refer to the
following. When used as a Binding Target, the Binding
Sources that can be associated are as follows. For more information of Data Binding concept,
refer to the following. |
| [Text Layout] |
| Configure text layout settings. |
| [Orientation] |
Select the orientation of text. |
When [Vertical] is selected, Japanese, Simplified Chinese,
Traditional Chinese and Korean text flow vertically. |

| [Rich Text] |
Select this check box to format the text. |
For working with rich text, refer to the following. |
| [Left Padding] / [Top Padding] / [Right Padding] / [Bottom Padding] |
Set the margins between text and the object’s left, top, right, and bottom edges. Setting Value Range: -100 - 1000 |
| [HiHi] / [Hi] / [Normal] / [Lo] / [LoLo] |
Set the display colors for each alarm type. Set when [Use Alarm Range] is selected as the [Alarm Color]. The settings are the same as the settings in [Shape]-[Text] or [Shape]-[Basic]. However, 'HiHi' / 'Hi' / 'Normal' / 'Lo' / 'LoLo' is added as a prefix for its source properties. |
Data Binding Support: To use as a Binding Source, refer to the
following. When used as a Binding Target, the Binding
Sources that can be associated are as follows. For more information of Data Binding concept,
refer to the following. |
| [Out of Input Range] |
Set the display colors when values are outside a specified range. Set when [Use Input Range] is selected as the [Alarm Color]. The settings are the same as the settings in [Shape]-[Text] or [Shape]-[Basic]. However, 'InputOutOfRange' is added as a prefix for its source properties. |
Data Binding Support: To use as a Binding Source, refer to the
following. When used as a Binding Target, the Binding
Sources that can be associated are as follows. For more information of Data Binding concept,
refer to the following. |
[Shape] - [Basic]
| [Fill] |
| Set fill color. |
| [Type] |
Select how to display colors. -[None]: Display no color. -[Solid]: Display a solid color. -[Blink]: Alternate between 2 colors. |
When selecting [Solid]When selecting [Solid]
| [Color] |
| [Value] '(object name).Fill.Color.Value' / '(object name).Fill.Color.ColorIndexEnabled' |
| Set the display color. To the right of the item name is the current display color. Click the display color to pop up a color palette. Select the color set up method, either [ID] or [RGB], which appears at the top of the color palette. -[ID]: From the color palette, select the display color you want to use. The display color is managed using the ID. While ID numbers are the same between color sets, because the display color depends on the color set, if you change the color set the display color will also change. -[RGB]: Set the display color in RGB format. Either select from the color palette, or enter the RGB value. |
For information about color sets, refer to
the following. Data Binding Support: To use as a Binding Source, refer to the
following. When used as a Binding Target, the Binding
Sources that can be associated are as follows. For more information of Data Binding concept,
refer to the following. |
| [Transparency] '(object name).Fill.Color.Transparency' |
Set the transparency level of the display color. Setting Value Range: 0 - 100 |
Data Binding Support: To use as a Binding Source, refer to the
following. When used as a Binding Target, the Binding
Sources that can be associated are as follows. For more information of Data Binding concept,
refer to the following. |
When selecting [Blink]When selecting [Blink]
| [Speed] |
Select the speed at which the two display colors switch. |
| [Color] |
| [Value] '(object name).Fill.Color1.Value' / '(object name).Fill.Color1.ColorIndexEnabled' '(object name).Fill.Color2.Value' / '(object name).Fill.Color2.ColorIndexEnabled' |
| Set the display color. To the right of the item name is the current display color. Click the display color to pop up a color palette. Select the color set up method, either [ID] or [RGB], which appears at the top of the color palette. -[ID]: From the color palette, select the display color you want to use. The display color is managed using the ID. While ID numbers are the same between color sets, because the display color depends on the color set, if you change the color set the display color will also change. -[RGB]: Set the display color in RGB format. Either select from the color palette, or enter the RGB value. |
For information about color sets, refer to
the following. Data Binding Support: To use as a Binding Source, refer to the
following. '(object name).Fill.Color2.Value' / '(object name).Fill.Color2.ColorIndexEnabled' When used as a Binding Target, the Binding
Sources that can be associated are as follows. For more information of Data Binding concept,
refer to the following. |
| [Transparency] '(object name).Fill.Color1.Transparency' / '(object name).Fill.Color2.Transparency' |
Set the transparency level of the display color. Setting Value Range: 0 - 100 |
Data Binding Support: To use as a Binding Source, refer to the
following. When used as a Binding Target, the Binding
Sources that can be associated are as follows. For more information of Data Binding concept,
refer to the following. |
| [Border] |
| Set border color. |
| [Type] |
Select how to display colors. -[None]: Display no color. -[Solid]: Display a solid color. -[Blink]: Alternate between 2 colors. |
When selecting [Solid]When selecting [Solid]
| [Color] |
| [Value] '(object name).Border.Color.Value' / '(object name).Border.Color.ColorIndexEnabled' |
| Set the display color. To the right of the item name is the current display color. Click the display color to pop up a color palette. Select the color set up method, either [ID] or [RGB], which appears at the top of the color palette. -[ID]: From the color palette, select the display color you want to use. The display color is managed using the ID. While ID numbers are the same between color sets, because the display color depends on the color set, if you change the color set the display color will also change. -[RGB]: Set the display color in RGB format. Either select from the color palette, or enter the RGB value. |
For information about color sets, refer to
the following. Data Binding Support: To use as a Binding Source, refer to the
following. When used as a Binding Target, the Binding
Sources that can be associated are as follows. For more information of Data Binding concept,
refer to the following. |
| [Transparency] '(object name).Border.Color.Transparency' |
Set the transparency level of the display color. Setting Value Range: 0 - 100 |
Data Binding Support: To use as a Binding Source, refer to the
following. When used as a Binding Target, the Binding
Sources that can be associated are as follows. For more information of Data Binding concept,
refer to the following. |
When selecting [Blink]When selecting [Blink]
| [Speed] |
Select the blink speed for the display color. |
| [Color] |
| [Value] '(object name).Border.Color1.Value' / '(object name).Border.Color1.ColorIndexEnabled' '(object name).Border.Color2.Value' / '(object name).Border.Color2.ColorIndexEnabled' |
| Set the display color. To the right of the item name is the current display color. Click the display color to pop up a color palette. Select the color set up method, either [ID] or [RGB], which appears at the top of the color palette. -[ID]: From the color palette, select the display color you want to use. The display color is managed using the ID. While ID numbers are the same between color sets, because the display color depends on the color set, if you change the color set the display color will also change. -[RGB]: Set the display color in RGB format. Either select from the color palette, or enter the RGB value. |
For information about color sets, refer to
the following. Data Binding Support: To use as a Binding Source, refer to the
following. '(object name).Border.Color2.Value' / '(object name).Border.Color2.ColorIndexEnabled' When used as a Binding Target, the Binding
Sources that can be associated are as follows. For more information of Data Binding concept,
refer to the following. |
| [Transparency] '(object name).Border.Color1.Transparency' / '(object name).Border.Color2.Transparency' |
Set the transparency level of the display color. Setting Value Range: 0 - 100 |
Data Binding Support: To use as a Binding Source, refer to the
following. When used as a Binding Target, the Binding
Sources that can be associated are as follows. For more information of Data Binding concept,
refer to the following. |
| [Border Thickness] '(object name).Thickness' |
Set the line width of the frame. Setting Value Range: 1 - 9 |
Data Binding Support: To use as a Binding Source, refer to the
following. When used as a Binding Target, the Binding
Sources that can be associated are as follows. For more information of Data Binding concept,
refer to the following. |
| [Display Image] |
Select this check box to display an image on the object. |
Set the image in the [Image] property. |
| [Image] | |||||||||||||||||||||||||||||||||||||||||||||||||||||
|
Select the image you want to display.
Supported SVG Elements and Attributes
* Supported in the screen editing software only.
Supported SVG Presentation Attribute
* Supported in the screen editing software only.
|
| [Image Layout] |
| [Proportional Mode] |
Select the image display method. -[None]: Regardless of the object size, its image is not scaled up or down. The image is displayed using its original size. -[Stretch]: Image is scaled to fit the size of the object. The aspect ratio of the image is not maintained. -[Uniform]: Image is scaled to fit the size of the object and the image’s aspect ratio is maintained. |
| [Horizontal Alignment] / [Vertical Alignment] |
Set when the [Display Mode] is not [Stretch]. Set the horizontal or vertical display position of the image. |
| [Transparency] '(object name).Transparency' |
Set the whole object’s color transparency. Setting Value Range: 0 - 100 |
When transparency is set for display colors, it results in higher transparency as it is applied to both colors. Data Binding Support: To use as a Binding Source, refer to the
following. When used as a Binding Target, the Binding
Sources that can be associated are as follows. For more information of Data Binding concept,
refer to the following. |
| [Shadow] |
| Set font shadow color. |
| [Vertical Thickness] / [Horizontal Thickness] |
Set the distance between an object and its shadow. Setting Value Range: 0 - 100 |
| [Color] |
| [Value] '(object name).Shadow.Color.Value' / '(object name).Shadow.Color.ColorIndexEnabled' |
| Set the display color. To the right of the item name is the current display color. Click the display color to pop up a color palette. Select the color set up method, either [ID] or [RGB], which appears at the top of the color palette. -[ID]: From the color palette, select the display color you want to use. The display color is managed using the ID. While ID numbers are the same between color sets, because the display color depends on the color set, if you change the color set the display color will also change. -[RGB]: Set the display color in RGB format. Either select from the color palette, or enter the RGB value. |
For information about color sets, refer to
the following. Data Binding Support: To use as a Binding Source, refer to the
following. When used as a Binding Target, the Binding
Sources that can be associated are as follows. For more information of Data Binding concept,
refer to the following. |
| [Transparency] '(object name).Shadow.Color.Transparency' |
Set the transparency level of the display color. Setting Value Range: 0 - 100 |
Data Binding Support: To use as a Binding Source, refer to the
following. When used as a Binding Target, the Binding
Sources that can be associated are as follows. For more information of Data Binding concept,
refer to the following. |
| [HiHi] / [Hi] / [Normal] / [Lo] / [LoLo] |
Set the display colors for each alarm type. Set when [Use Alarm Range] is selected as the [Alarm Color]. The settings are the same as the settings in [Shape]-[Text] or [Shape]-[Basic]. However, 'HiHi' / 'Hi' / 'Normal' / 'Lo' / 'LoLo' is added as a prefix for its source properties. |
Data Binding Support: To use as a Binding Source, refer to the
following. When used as a Binding Target, the Binding
Sources that can be associated are as follows. For more information of Data Binding concept,
refer to the following. |
| [Out of Input Range] |
Set the display colors when values are outside a specified range. Set when [Use Input Range] is selected as the [Alarm Color]. The settings are the same as the settings in [Shape]-[Text] or [Shape]-[Basic]. However, 'InputOutOfRange' is added as a prefix for its source properties. |
Data Binding Support: To use as a Binding Source, refer to the
following. When used as a Binding Target, the Binding
Sources that can be associated are as follows. For more information of Data Binding concept,
refer to the following. |
[Shape] - [Size/Location]
| [Location] |
| [Left] / [Top] '(object name).Location.Left' / '(object name).Location.Top' |
Specify the coordinates of the object’s top-left border. The top-left part of the drawing screen is the start point for coordinates. Setting Value Range: -5000 - 10000 |
Set when drawing objects away from Grid, Scroll Grid, Uniform Grid, Dock Panel, and Stack Panel coordinates. Data Binding Support: To use as a Binding Source, refer to the
following. When used as a Binding Target, the Binding
Sources that can be associated are as follows. For more information of Data Binding concept,
refer to the following. |
| [Row] / [Column] '(object name).Location.Row' / '(object name).Location.Column' |
Set the location of an object to place with row and column
numbers. Setting Value Range: 0 - 100 |
Set when placing objects in a Grid or Scroll Grid. Data Binding Support: To use as a Binding Source, refer to the
following. When used as a Binding Target, the Binding
Sources that can be associated are as follows. For more information of Data Binding concept,
refer to the following. |
| [Row Span] / [Column Span] '(object name).Location.RowSpan' / '(object name).Location.ColumnSpan' |
Set the row span or column span when you want to place an object on multiple rows and/or columns. Setting Value Range: 1 - 100 |
Set when placing objects in a Grid or Scroll Grid. Data Binding Support: To use as a Binding Source, refer to the
following. When used as a Binding Target, the Binding
Sources that can be associated are as follows. For more information of Data Binding concept,
refer to the following. |
| [Dock] '(object name).Location.Dock' |
Select the direction where you want to dock the object. |
(The value in brackets represents the value of the source property.) -[Left] (0) -[Top] (1) -[Right] (2) -[Bottom] (3) Setting Value Range: 0 - 3 Data Binding Support: To use as a Binding Source, refer to the
following. When used as a Binding Target, the Binding
Sources that can be associated are as follows. For more information of Data Binding concept,
refer to the following. |
| [Width] / [Height] '(object name).Width' / '(object name).Height' |
Set the object width and height. Setting Value Range: 1 - 5000 |
When placing objects on a Grid, Scroll Grid, or Uniform Grid, in order for the object to line up with grid borders, use the width and height default values. Data Binding Support: To use as a Binding Source, refer to the
following.
Note that if the width and height remain as their default values, the value
of the Binding Source is 0. When used as a Binding Target, the Binding
Sources that can be associated are as follows. For more information of Data Binding concept,
refer to the following. |
| [Angle] |
Set the rotation angle for the object. Set the rotation angle in the clockwise direction. Setting Value Range: -360 - 360 |
| [Margin] |
| [Left] / [Right] / [Top] / [Bottom] |
Set the margins on the object. [Margin] settings depend on [Object Alignment] and [Width]/[Height] settings. This setting works together with [Object Alignment]. Setting Value Range: -1000 - 1000 |
The margin is not part of the object area. Touching its margin is not the same as touching the object. |
| [Object Alignment] |
| [Horizontal] |
Select the horizontal alignment option. When the object is on [Canvas], [Scroll Canvas], [Zoom Canvas], [View Box], this setting does not work. -[Left]: The object are left-aligned with respect to the
drawing target. The object position shifts right by the numerical
value set in [Left] margin. [Right] margin is ignored. |
When object [Width] is set as default value (value are set in brackets), object alignment is same as [Stretch] even when you select other option than [Stretch]. |
| [Vertical] |
Select the vertical alignment option. When the object is
on [Canvas], [Scroll Canvas], [Zoom Canvas], [View Box], this
setting does not work. |
When object [Height] is set as default value (value are set in brackets), object alignment is same as [Stretch] even when you select other option than [Stretch]. |
| [Animation] |
| [Horizontal Offset] / [Vertical Offset] '(object name).Animation.HorizontalOffset' / '(object name).Animation.VerticalOffset' |
Set the value to move the object in horizontal or vertical
direction. Setting Value Range: -5000 - 10000 |
Data Binding Support: To use as a Binding Source, refer to the
following. When used as a Binding Target, the Binding
Sources that can be associated are as follows. For more information of Data Binding concept,
refer to the following. |
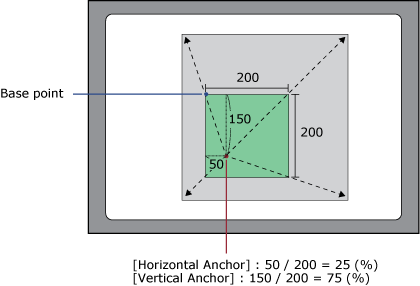
| [Horizontal Anchor] / [Vertical Anchor] '(object name).Animation.HorizontalAnchor' / '(object name).Animation.VerticalAnchor' |
Set the origin point (X/Y axis) of the object that is scaled
up/down. Setting Value Range: 0 - 100 |
When [Horizontal Anchor] = 25 and [Vertical Anchor] = 75, the base point is as shown below.
Data Binding Support: To use as a Binding Source, refer to the
following. When used as a Binding Target, the Binding
Sources that can be associated are as follows. For more information of Data Binding concept,
refer to the following. |
| [Horizontal Scale] / [Vertical Scale] '(object name).Animation.HorizontalScale' / '(object name).Animation.VerticalScale' |
Set the percentage of object after scaling up or down. Setting Value Range: -32768 - 32767 |
Data Binding Support: To use as a Binding Source, refer to the
following. When used as a Binding Target, the Binding
Sources that can be associated are as follows. For more information of Data Binding concept,
refer to the following. |
| [Rotation Center (X)] / [Rotation Center (Y)] '(object name).Animation.RotationCenterX' / '(object name).Animation.RotationCenterY' |
Set the rotation center (X/Y axis) for the object. Setting Value Range: -1000 - 1000 |
When [Rotation Center (X)] = 50, and [Rotation Center (Y)] = 500, the rotation center is as shown below.
0 is the left or top side of the object, and 100 is the right or bottom side of the object. Data Binding Support: To use as a Binding Source, refer to the
following. When used as a Binding Target, the Binding
Sources that can be associated are as follows. For more information of Data Binding concept,
refer to the following. |

| [Rotation Angle] '(object name).Animation.RotationAngle' |
Set the rotation angle for the object. Setting Value Range: -32768 - 32767 |
Data Binding Support: To use as a Binding Source, refer to the
following. When used as a Binding Target, the Binding
Sources that can be associated are as follows. For more information of Data Binding concept,
refer to the following. |
| [Visibility] '(object name).Visibility' |
Select the visibility state of the object. -[Visible] (0): Display the object. -[Hidden] (1): Hide the object. The object area is maintained. -[Collapsed] (2): Collapse the object. The object area is also collapsed. You can dynamically change the screen layout by collapsing objects on the Uniform Grid, Stack Panel, or Dock Panel. Setting Value Range: 0 - 2 |
Data Binding Support: To use as a Binding Source, refer to the
following. When used as a Binding Target, the Binding
Sources that can be associated are as follows. For more information of Data Binding concept,
refer to the following. |