Common Features (such as Interlock)
These are some of the common features which are applicable for both Shapes and Parts.
- [Operation]
- [Interlock]
- [Beep Type]
- [Press Effect]
- [Font] - [Type]
- [Rich Text]
- [Color When Selected]
[Operation]
You can configure an operation to execute by touching the object.
To enable operation to the object:
- Select the object on the screen.
- In Properties window, go to [Function] tab ➞ [Touch] tab ➞ [Operation].
- Select the desired operation [Type] and [Operation] from the list.
[Type]: [Bit]
| [Operation] | Description |
| [Set] | Turns ON the specified boolean source property in the [Destination]. |
| [Reset] | Turns OFF the specified boolean source property in the [Destination]. |
| [Toggle] | Switches from ON/OFF or vice versa based on the specified boolean
source property.
|
[Momentary ON] |
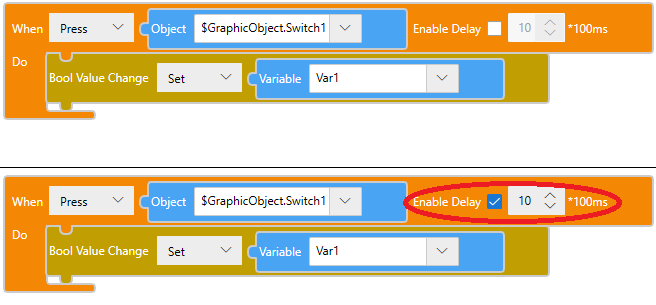
Turns ON the specified boolean source property while the object is pressed, and turns OFF the boolean source property when the object is released. You can add a delay with the [Enable Delay] property below. |
| [Momentary OFF] | Turns OFF the specified boolean source property while the object is pressed, and turns ON the boolean source property when the object is released. You can add a delay with the [Enable Delay] property below. |
| [Enable Delay] | Used with Momentary ON and Momentary OFF operations, defines
the amount of time the object must be pressed until the boolean
source property is turned either ON or OFF. Specify the delay
time in units of 100 milliseconds.
If you want to set a delay after the object is released, until
the boolean source property is turned either ON or OFF, you
cannot use this setting. Instead, draw a switch and create
a script as follows. |
[Type]: [Word]
| [Operation] | Description |
| [Set] | Writes the source property or constant specified in the [Source] to the source property specified in the [Destination] field and copies the result to the destination source property. |
| [Add] | Adds the source property or constant specified in the [Source] to the source property specified in the [Destination] field and copies the result to the destination source property. |
| [Subtract] | Subtracts the source property or constant specified in the [Source] from the source property specified in the [Destination] field and copies the result to the destination source property. |
| [Multiplication] | Multiplies the source property or constant specified in the [Source] by the source property specified in the [Destination] and copies the result to the destination source property. |
| [Division] | Divides the source property or constant specified in the [Source] by the source property specified in the [Destination] and copies the result to the destination source property. |
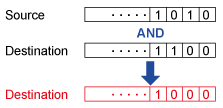
| [AND] | Runs an AND operation (Bitwise AND) between the integer or
source property specified in the [Source] with the source property
specified in the [Destination] field and then copies the result
to the destination source property.
 |
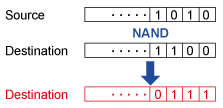
| [NAND] | Runs the NAND operation (logical product followed by NOT) between
the integer or source property specified in the [Source] and the
source property specified in the [Destination] and copies the
result to the destination source property.
 |
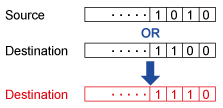
| [OR] | Writes the OR value (logical sum) of the integer or source
property specified in the [Source] and the source property specified
in the [Destination] and copies the result to the destination
source property.
 |
| [NOR] | Writes the NOR value (logical sum followed by Inverter) of
the integer or source property specified in the [Source] and the
source property specified in the [Destination] and copies the
result to the destination source property.
 |
| [XOR] | Writes the XOR value (exclusive logical sum) of the integer
or source property specified in the [Source] and the source property
specified in the [Destination] and copies the result to the destination
source property.
 |
[Type]: [String]
| [Operation] | Description |
| [Set] | Writes the source property or constant specified in the [Source] to the source property specified in the [Destination] and copies the result to the destination source property. |
| [ConCatenate] | Writes the source property or constant specified in the [Source] to the source property specified in the [Destination] and combines the result to the destination source property. |
[Type]: [Screen Change]
| [Operation] | Description |
| [Previous] | Return to a previous screen. |
| [Specific ID] | Change to the screen associated with the specified ID.
|
[Type]: [Content Change]
| [Operation] | Description |
| [Previous] | Return to previous content. |
| [Specific ID] | Change to the content associated with the specified ID.
|
[Interlock]
If the Interlock condition set for the object is met, then touch function is enabled. This feature prevents accidental touch inputs.
To enable interlock to the object:
- Select the object on the screen.
- In Properties window, go to [Function] tab ➞ [Detail] tab and enable [Interlock].
- Set the interlock condition.
| Data Type | Interlock is OFF | Interlock is ON |
| BOOL | False | True |
[Beep Type]
You can enable buzzer on touch for the object.
To enable buzzer:
- Select the object on the screen.
- In Properties window, go to [Function] tab ➞ [Detail] tab and select the [Beep Type] from the list.
- [None]: No Beep.
- [One shot]: Beeps once.
- [Continuous]: Beeps continuously.
- [Periodic]: Beeps at a regular interval.
[Press Effect]
You can change the appearance of the switch at runtime.
[Shift]
When Switch is pressed, the switch moves to the right by 4 pixels and down by 4 pixels.
- If you press the end of the switch, the switch will not function because the position of the touched position and the switch differs.
- If you enable shadow, the switch position will move onto the shadow position.
[Invert]
When switch is pressed the switch background color changes.
Below objects supports this feature:
CheckBox object
Lamp object
N-State Lamp object
Radio Button object
Toggle Switch object
[Font] - [Type]
If you use a text whose character code is not supported by the selected font, then the text will be displayed as a white space character or square symbol.
[Rich Text]
You can format the text displayed on an object.
To format text, follow the steps below.
- Select the object on the screen.
- From the Properties window, go to [Shape] tab → [Text] tab, and from the [Text Layout] list select [Rich Text].
- In the [Text], type text you want to format between rich text tags.
The text formatting does not display in the screen editor. Check the formatting in simulation.
For information on simulation, see the following.
Rich Text Tags
| Style | Tag | Display |
| Bold | <b>AB</b>CDE | ABCDE |
| Italic | <i>AB</i>CDE | ABCDE |
| Underline | <u>AB</u>CDE | ABCDE |
| Color | <font color="#FF0000">AB</font>CDE | ABCDE |
| Size | <font style="font-size:10px">AB</font>CDE | ABCDE |
| Background | <font style="background:#FF0000">AB</font>CDE | ABCDE |
| Line break | AB<br>CDE | AB CDE |
When the line break tag is used on an object with the [Enable Input Mode] and [Rich Text] properties enabled, the keypad does not display or enter the line break correctly.
When applying multiple styles to an object, see the following.
| Style | Tag | Display |
| Color and Bold | <font color="#FF0000"><b>AB</b></font>CDE | ABCDE |
| Background and Size | <font style="background: #FF0000; font-size 10px">AB</font>CDE | ABCDE |
| Color and Size | <font style="font-size: 10px" color="#FF0000">AB</font>CDE | ABCDE |
[Color When Selected]
Specify the reversal method when an object is selected. For dropdown list and recipe dropdown objects, specify the reversal method when an item in the list is selected.
- [Reverse Color]: When the object is selected at run time, colors are flipped. The [Font Color] is applied to the [Fill], and the [Fill] color is applied to the [Font Color].
- [Reverse Color & Transparency]: When the object is selected at run time, colors and transparency are flipped. The [Font Color] and [Transparency] are applied to the [Fill], and the [Fill] color and [Transparency] are applied to the [Font Color].
When using [Reverse Color] on an object set up with blink on one of either the [Font Color] or [Fill], when the object is selected and colors are flipped, the first transparency setting is applied to the blink colors.
Example
| Color/Transparency When Displayed | Color/Transparency When Selected | |
| Front Color | (1) Value: ID1 Transparency: 50% (2) Value: ID2 Transparency: 80% |
Value: ID9 Transparency: 50% |
| Fill | Value: ID9 Transparency: 0% |
(1) Value: ID1 Transparency: 0% (2) Value: ID2 Transparency: 0% |
The following objects support this feature.
Date/Time Display
Dropdown List
Numeric Display
Recipe Dropdown
String Display
Time Display