Properties (All Alarms)
| [Max Record] 'Alarm.MaxRecord' |
Set the number of alarm history records to save. When alarm history exceeds the set value, the process specified by the [Operation When [Save in] Is Full] field is executed. The alarm history includes alarms and system errors for all alarm groups. Setting Value Range: 0 - 2147483647 |
Data Binding Support: To use as a Binding Source, refer to the
following. For more information of Data Binding concept,
refer to the following. |
| [Operation When [Save in] Is Full] |
Select the operation that occurs when the alarm history
exceeds the number of [Max Record]. |
| [Save in] |
Select the save location for alarm history from the following. |
When you use external storage for saving alarm history, turn off the display unit before removing the external storage. If you remove external storage before turning off the display unit, the alarm history cannot save even though the external storage is inserted again. In this scenario, restart the display unit after inserting external storage. We recommend you avoid selecting external storage that is often removed from the display unit.
|
| [Encryption] |
Select this check box to encrypt the saved alarm history. The default value is enabled. Clear this check box if you do not want to encrypt the saved alarm history. |
| [Enable] |
You can save alarm history on the display unit to a file. |
Note: For information about exporting and importing, refer
to the following. |
| [Data Storage] |
Select the export file location from the following. |
|
| [Append Date/Time] |
At the end of the file name of the exported, append the
export date and time. |
|
| [Detect Modification] |
Detects modifications to the exported file. Use the Export File Validation tool to detect modifications. |
When [Detect Modification] is enabled, an alphanumeric string
is added to the first line of the exported file. This string is
used by the Export Validation Tool to detect modifications to
the file data. When using the Export Validation Tool, do not erase
or modify this string. |
| [Folder Name] 'Alarm.ExportData.FolderName' |
Set the name of the folder. (Example: \Log) A sub folder with a Alarm Mode name (‘Log’ of ‘Active’) used for export is created in the folder and the export file is saved. Set Alarm Mode in the [Export Alarm Data] operation. |
On the IPC Series, to use a specific language for folder and file names, set up in [Control Panel] > [Change system locale]. Data Binding Support: To use as a Binding Source, refer to the
following. When used as a Binding Target, the Binding
Sources that can be associated are as follows. For more information of Data Binding concept,
refer to the following. |
| [File Name] 'Alarm.ExportData.OutputFileName' |
Set the name of the exported file. (Example:
LogData) |
On the IPC Series, to use a specific language for folder and file names, set up in [Control Panel] > [Change system locale]. Data Binding Support: To use as a Binding Source, refer to the
following. When used as a Binding Target, the Binding
Sources that can be associated are as follows. For more information of Data Binding concept,
refer to the following. |
| [Save Status] 'Alarm.ExportStatus.SaveStatus' |
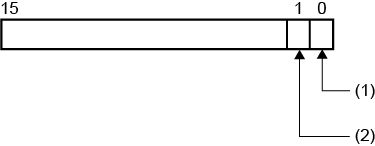
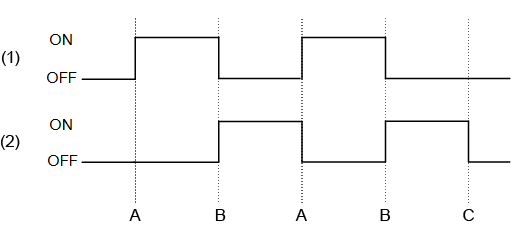
Set an integer variable to store the start and completion status of the export process. From the property marker, select [Variable]. |
When exporting, the following is stored in the save status. Data Binding Support: To use as a Binding Source, refer to the
following. When used as a Binding Target, the Binding
Sources that can be associated are as follows. For more information of Data Binding concept,
refer to the following. |
| [Error Status] 'Alarm.ExportStatus.ErrorStatus' |
Set an integer variable for storing the result of the export process. From the property marker, select [Variable]. |
When the end bit (bit position:1) of the variable specified in the [Save Status] field is ON, the following results appear in the error status. Data Binding Support: To use as a Binding Source, refer to the
following. When used as a Binding Target, the Binding
Sources that can be associated are as follows. For more information of Data Binding concept,
refer to the following. |
| [Hi/Lo Status Behavior] |
Select how alarm states operate when the value of the variable configured with a level alarm changes from Hi to HiHi or Lo to LoLo.
|
If you select [Remain Active on HiHi/LoLo] and a changed value exceeds more than one alarm type, all applicable alarms occur at the same time. (Example) For a level alarm with Hi set to 50 and HiHi set to 100, and the value changes from 0 to 105, both Hi and HiHi occur at the same time. As a result the Alarm Summary object displays both of the alarms and in this order Hi, HiHi, to match the direction of change in value (0 to 105). |

 Variable]
