BLUE Web Viewer Overview and Development Workflow
About BLUE Web Viewer
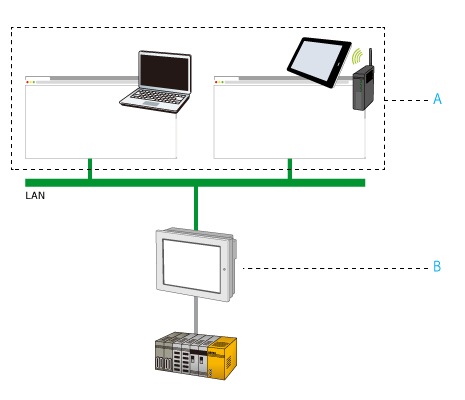
“BLUE Web Viewer” (hereafter referred to as “Web Viewer”) is a feature that runs on a display unit for sharing screen information with Web browsers on smart phones and tablets (hereafter referred to as “smart devices”) as well as on computers. Using Web Viewer, the display unit is a server, and the smart devices and computers connecting to the server are clients.
- Clients
- Server
Using a client, you can also perform operations on the server from a Web browser. Remote operation of the server from a client is possible when the network is set up so clients can connect to the server.
A single server can allow multiple, simultaneous client connections.
Example applications:
-
Remote operation and monitoring of equipment installed with the display unit
-
View the display unit screen on a large monitor
- For models that support Web Viewer and the number of Web Viewer clients, refer to the following.
Supported Model/Feature List - Communication may become unstable depending on the network environment and the performance of the client device.
There are many applications where Web Viewer might be required, such as interacting with machinery that is located in a hard to reach location (such as in a clean room or at the other end of a large facility), or interacting with a display unit that is configured without a display module.
Even though the Web Viewer system can support multiple clients connecting to the server and viewing the panel interface, only one client can interact with the server (touch operation) at any time.
Web Viewer Operating Environment
|
Item |
Description |
|||||||||||||||||
|
Server
|
For models and the number of simultaneous client connections, refer to the following. |
|||||||||||||||||
| Client |
HTTP
HTTPS
Internet Explorer and Firefox are not supported. |
|||||||||||||||||
|
Supported protocols |
|
|||||||||||||||||
|
Supported languages (user interface) |
English, French, German, Spanish, Italian, Portuguese, Simplified Chinese, Traditional Chinese, Korean, and Japanese | |||||||||||||||||
To build a secure network to prevent unauthorized access
To build a secure network to prevent unauthorized access, see the following.
We especially recommend doing the following.
- Build a communication environment using encrypted communication (for example, VPN).
- Install the display unit on a trusted secure network and protect the display unit with a firewall.
- When available, use HTTPS and configure user authentication.
Pro-face Connect
You can use Pro-face Connect to build an encrypted communication environment.
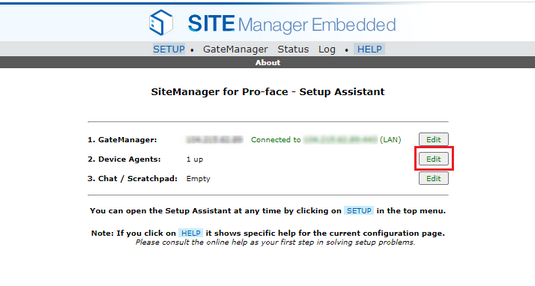
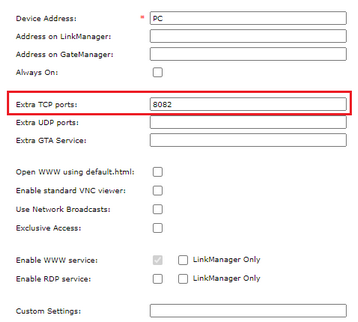
When using Pro-face Connect with Web Viewer, in the Creating an Agent settings add the port setting.
Adding port settingAdding port setting
- In the [SiteManager] window, on the right-hand side of [Device
Agents] click [Edit].
- On the target agent, click the icon
 to display additional parameters.

- In the [Extra TCP ports] field, type the port number as configured
in the screen editing software, and click [Save].
- For more details on Pro-face Connect Configuration, refer Pro-face Connect Manual.
- You cannot use smart devices as Web Viewer client on an encrypted communication environment built by Pro-face Connect.
Development Flow
- Configuring the Server
- Configuring User Authentication Settings
- Exporting and Installing an SSL Certificate
Configuring the Server
The following describes the steps to configure the server.
To increase security, we recommend you enable [Security Setting]. By enabling [Security Setting], when a client accesses the server, user authentication is required.
-
In the Project Explorer window, go to [System Architecture] and click [Target01].
-
In the Properties window, click [Advanced] tab and click [Data Access] tab.
- Go to [Web Function Settings] and select the [Enable Web Viewer] check box.
- Go to [Web Viewer Settings] and select the [Security Settings] check box.
- If necessary, change the port number in [Port Number].
- The [Port Number] is shared between Web Server and Web Viewer. Valid port number is between 1024 and 65535.
- For information about individual Web Viewer settings, refer to the following.
Configuring User Authentication Settings
In the Web Viewer settings, enable [Security Setting] so that user authentication is required when a client accesses the server. Users and user groups set up in the project are used for user authentication.
- Changes to security information at run time, such as importing users and user groups, will automatically log out clients from the server, except when the [Web Viewer Settings] ➞ [Security Setting] is disabled.
- Changing the password of a single user at run time will automatically log out the associated user from a client.
- The Web Viewer client cannot make any changes to user authentication settings.
To configure user authentication:
- Configure users and user groups. Refer to the following.
Steps to Design (Security) - In the Project Explorer window, go to [Security] and click the desired user group.
- In the Properties window, set the [Web Viewer Access Right] property.
Exporting and Installing an SSL Certificate
To use HTTPS, export the SSL certificate from the display unit and install it on the client device.
How to Install SSL Certificate on the Client
- When HTTPS is enabled, if no SSL certificate exists at the time of the first startup, the display unit automatically generates one.
- The SSL certificate is valid for 825 days.
- Once the SSL certificate expires, restarting the display unit will automatically regenerate a new certificate.
- If the IP address is changed while the SSL certificate is still valid, the certificate will be considered invalid. In this case, the certificate will not be regenerated automatically. You must manually regenerate it from the Hardware Configuration screen.
- The SSL certificate must include the IP address used in the URL. The display unit uses the IP address of an active network adapter at startup to generate the certificate. Therefore, if the IP address used during certificate generation differs from the one used during actual operation, HTTPS communication may fail. For this reason, enabling DHCP may result in unexpected IP addresses being used for communication.
- The loopback address (127.0.0.1) cannot be used for HTTPS communication. However, it can be used during Simulation.
- HTTPS is supported in Simulation mode, but a new SSL certificate is generated each time Simulation is started.