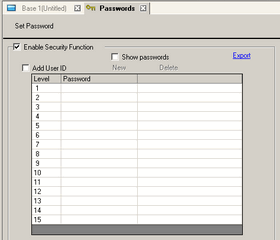
<Level Mode>
<User ID Mode>
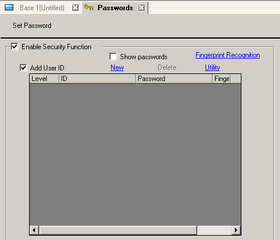
Sets the password and user ID for the 15 security levels.
You can select "Level Mode", "User ID Mode", or "User ID-Enhanced Mode" from the pull-down menu.
|
<Level Mode>
|
<User ID Mode>
|
Enable Security Function
Select to use the security function.
Add User ID
Specifies whether the User ID is added to the level settings.
You can select "Level Mode", "User ID Mode", or "User ID-Enhanced Mode" from the pull-down menu.
 22.11 Password/User ID Input Window
Level/Password
For Level Mode
Sets password for level 1 to 15.
Enter a password with up to eight single-byte alphanumeric characters. Passwords and User ID are case-sensitive.
Set passwords only for the security levels you want to use. It is not required to set passwords for all security levels.

When Level Mode is selected, you cannot set the same password for multiple security levels.
By setting a password in security level 15, you can go to offline mode on the display unit to change all security level passwords.
Level/Password/User ID
For User ID Mode or User ID-Enhanced Mode
Up to 100 passwords can be registered.
You can set the level between 1 to 15 optionally.
When "User ID Mode" is selected, up to 8 single-byte alphanumeric characters can be used for the password and user ID. Passwords and User ID are case-sensitive.
When "User ID-Enhanced Mode" is selected, enter a password between 8 and 16 characters.
Enter the password as a combination of one or more of each of the following characters: upper-case alphabetic character, lower-case alphabetic character, number, and the following symbols.
` ( ) ~ ! @ # $ % & : ; . , - _ { } * + = | < > ? [ ] ` " / ^
For User ID Mode and User ID-Enhanced Mode, you can set the same password for multiple security levels, but you cannot set the same user ID for multiple security levels.
When Level Mode is changed to User ID Mode or User ID-Enhanced Mode, only rows that already have passwords can be registered with User ID Mode or User ID-Enhanced Mode.

If you select "Level Mode" after you selected "User ID Mode" or "User ID-Enhanced Mode", a message box appears warning that all registered content in the password settings will be deleted. Selecting "Yes" deletes all the registered content.
Show passwords
Select the [Show passwords] check box to display passwords.
Export
Displayed when "Level Mode" is selected.
Exports the password settings. A [SECURITY] folder is created in the specified output location and a file with the name "SECURITY.CSV" is saved in that location.
Adding/Deleting
When "User ID Mode" or "User ID-Enhanced Mode" is selected, [New] and [Delete] are enabled. Select [New] to add one row to the Password and User ID registration table. Select [Delete] to erase the selected row.
Utility
Displayed when "User ID Mode" or "User ID-Enhanced Mode" is selected.
Export
Outputs the set user ID/password/level. A [SECURITY] folder is created in the specified output location and a file is output to that location.
CSV file format (display unit)
User ID/Password/Level is output to the file "SECURITY.CSV".
By saving the output CSV file to external storage, you can use a special switch to reflect the CSV file contents on the display unit. Plus, you can use the Special Data Display part's [File Manager] and [Show CSV] to edit the CSV file on the display unit.
EPS file format (display unit)
User ID/Password/Level is output to the file "SECURITY.EPS".
By saving the output EPS file to external storage, you can use a special switch to reflect the EPS file contents on the display unit.
You cannot edit the EPS file on a computer, such as in Microsoft Excel.
The password settings cannot be exported if a password fails to meet the security requirements or if there are duplicate user IDs. The export will be canceled.
Set Security Level For Each Feature
Sets whether or not to set functional security settings.
Functions that can be set are as follows.
|
Items |
Feature |
|---|---|
|
System Card |
- |
|
Offline Mode |
Offline Feature |
|
Logic Monitor |
Logic Feature |
|
Online Logic Editing |
Logic Feature |
|
Read GP-Viewer Data |
GP-Viewer Function |
|
Write GP-Viewer Data |
GP-Viewer Function |
|
Review files in an FTP folder |
FTP Function |
|
Save or delete files in a FTP folder |
FTP Function |
[System Card] is available only on the SP5000 series (excluding Standard Box). If set at Level 15, a password is required when you insert the system card in another box module. We recommend that you set a password to prevent the unauthorized use of data.
Sets the level for the security settings function.
Security level 0 means no security is set.
Level 0 or Level 15
For [Offline Mode] and [System Card], set either Level 0 or Level 15.
To set up level 15, you need to set up a level 15 password.
Level 0 to Level 15
For Logic Function, GP-Viewer Function, and FTP Function, you can set the security level between 0 to 15. However, the following standards for the level settings apply depending on each function.
Logic Monitor and Online Logic Editing
Only a constant level, or a high Online Logic Editing level, can be set.
Read GP-Viewer Values, Write GP-Viewer Values
You can only set the normal level or a level higher than that set up for Write GP-Viewer Data.
Browsing files in the FTP folder and Save and Delete files in the FTP folder
You can only set the normal level or a level higher than that set up for Save or delete files in FTP folder.
When checked, the operation of that function will be disabled regardless of the security level. [Write GP-Viewer EX Data] or [Save or delete files in FTP folder] can be set.
Extended
Displays the [Extended] dialog box.
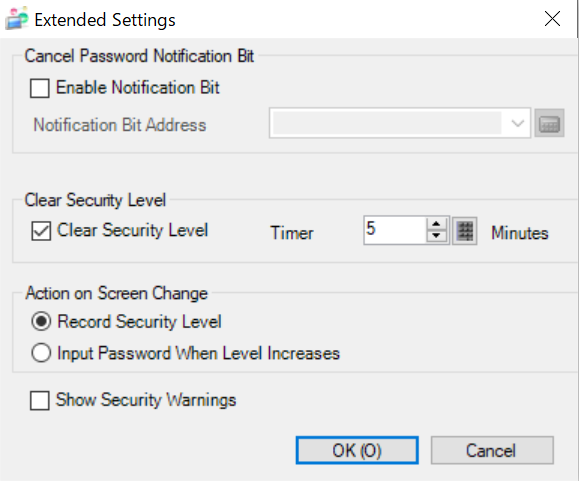
Enable Notification Bit
Select this check box to send a notification when the ESC key is used to exit the password input window after a change screen operation initiated by the device/PLC.
This will not work when changing screens by touch.
Notification Bit Address
When you cancel a password input window displayed via the Device/PLC control with the [ESC] key, the designated Notification Bit Address turns ON.
From [Project] menu, point to [System Settings] and click [Display Unit] to open the dialog box and click [Display Settings] tab. If [Reflect in Device/PLC] is not selected, monitor the notification bit. If it turns ON, on the device/PLC reset the [Change-To Screen] to the same number as the [Current Screen]. When screen numbers match, the password input window closes.
To operate [Change-To Screen] via a Device/PLC, please configure the System Data Area.
4.4.6 System Settings [Display Unit] - [System Area] Settings Guide
When using forced screen change (in the System Data Area's [Change-To Screen] bit 15 is ON), input from the password input window is canceled when [Clear After Time Has Elapsed]. Although the Notification Bit Address turns ON, the password input window continues to display.
Clear Security Level
This feature specifies whether to return the security level status to "0", assuming no display unit operations/screen changes are performed within the time specified in [Timer].
Timer
Specify the auto clear time from 1 to 60 minutes.
When using an internal device address bit operation, setting bit 0 of LS9300 OFF -> ON clears the security level and resets the security level value in LS9301 to zero. After the Security Level Clear occurs, return LS9300's 0 bit to OFF. (LS9301 is read-only)

Action on Screen Change
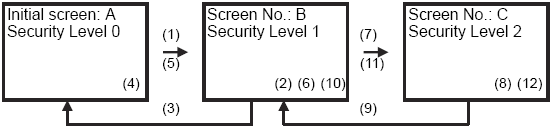
Record Security Level
Once the security level becomes higher, the current level will not be lowered unless it is automatically cleared or cleared with the security control address (LS9300). Therefore, you can change the screen as required.
Input Password When Level Increases
When changing to a screen with a security level lower than the current security level, the level is lowered to the security level of the screen change.
Therefore, next time you switch the screen with lower security level to the screen with higher security level, you will require password authentication.
For example,
|
Record Security Level |
Current Level |
|---|---|
|
(1) Level 1 Password Screen |
0 |
|
(2) Screen B is displayed |
1 |
|
(3) No password required |
1 |
|
(4) Screen A is displayed |
1 |
|
(5) No password required |
1 |
|
(6) Screen B is displayed |
1 |
|
(7) Level 2 Password Screen |
1 |
|
(8) Screen C is displayed |
2 |
|
(9) No password required |
2 |
|
(10) Screen B is displayed |
2 |
|
(11) No password required |
2 |
|
(12) Screen C is displayed |
2 |
|
Input Password When Level Increases |
Current Level |
|---|---|
|
(1) Level 1 Password Screen |
0 |
|
(2) Screen B is displayed |
1 |
|
(3) No password required |
1 |
|
(4) Screen A is displayed |
0 |
|
(5) Level 1 Password Screen |
0 |
|
(6) Screen B is displayed |
1 |
|
(7) Level 2 Password Screen |
1 |
|
(8) Screen C is displayed |
2 |
|
(9) No password required |
2 |
|
(10) Screen B is displayed |
1 |
|
(11) Level 2 Password Screen |
1 |
|
(12) Screen C is displayed |
2 |
This applies only when changing base screens (including sub display screens)
If [Input Password When Level Increases] is selected in User ID Mode, the system variable #H_LoginUserID will not be updated when the level is lowered on screen change.
When using GP-Viewer feature, even if [Input Password When Level Increases] is selected on GP-Viewer side, this will not function. This always operates with [Record Security Level].
Show Security Warnings
When enabled, displays the security warning when operation is attempted with the password or user ID lower than the security level set to the functions.
Enable Account Lock
When enabled, this function locks a user ID (account) if the wrong password is entered a certain number of times in a row. The account will unlock after the specified time has elapsed.
This setting is only available when [User ID-Enhanced] is selected under [Enable Security Function] in [Password Settings].
Account lock is only applied while the system is running.
While locked out, logging on will not be possible even if the correct password is entered.
No notifications are sent even if the lockout is lifted.
Maximum Password Attempts
Set the number of attempts required before the account is locked.
Lockout Duration
Set the time period after which a locked account can be unlocked. Units are in minutes.
Enable Password Expiration
Enable to set an expiration date for the password.
This setting is only available when [User ID-Enhanced] is selected under [Enable Security Function] in [Password Settings].
22.12 Password expiration date
Duration
Enter the number of days remaining until the expiration date. The password will expire at 0:00 on the day after the set number of days has elapsed.
For example, if the [Duration] is set to 30 days and the password is set or updated on January 1st, it will expire at 0:00 on January 31st.
The elapsed number of days is calculated based on the clock of the display unit. Moving the date forward or backward will also change the number of days remaining until the expiration date.