During run time (while communicating with the device/PLC), you can adjust the screen brightness and contrast for the display unit, and the brightness for the EZ Illuminated Switch, by using the Brightness/Contrast control bar.
![]() M.16 Brightness and Contrast Adjustment Settings Guide
M.16 Brightness and Contrast Adjustment Settings Guide
![]()
You cannot adjust the brightness/contrast when the display unit is starting up.
For the SP5000 Series Open Box, IPC Series, and PC/AT, you cannot adjust the screen brightness and contrast for the display unit by using the Brightness/Contrast control bar.
Refer to the "SP5000 Series Open Box Reference Manual" when you want to adjust the brightness of the SP5000 Series Open Box. You can download the manual from our dedicated support website (http://www.pro-face.com/trans/en/manual/1001.html).
For the SP5000 Series Open Box, IPC Series, and PC/AT, the Brightness/Contrast control bar displays the EZ Illuminated Switch settings menu when the EZ Illuminated Switch is connected.
Adjusting the Brightness/Contrast
Touch the top-right then bottom-left corners, or the top-left and bottom-right corners of the panel (within a 40 pixel area) inside 0.5 seconds.
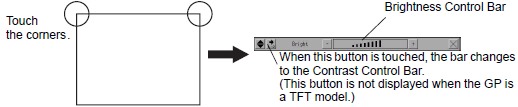
You can adjust the level of brightness intensity by touching [+] or [-] on the Brightness/Contrast control bar.
![]()
You can also adjust the contrast for non-TFT color LCD units.![]() By touching the icon indicated, the Contrast control bar appears, where you can adjust the contrast.
By touching the icon indicated, the Contrast control bar appears, where you can adjust the contrast.
Touch [X] on the Brightness/Contrast control bar to end adjustment.
Adjusting the Brightness for the EZ Illuminated Switch
In the project settings, set [Illuminated Switch] to [Enable]. Transfer the project to the display unit.
![]() 15.6.2 System Settings [Input Equipment] Settings Guide - Illuminated Switch
15.6.2 System Settings [Input Equipment] Settings Guide - Illuminated Switch
Connect EZ Illuminated Switch to the display unit.
Touch the top-right then top-left corners, or the top-left then top-right corners, of the display screen to view the Brightness/Contrast control bar.
On the Brightness/Contrast control bar, touch [Display] to change to [Illuminated Switch].
You can adjust the level of brightness intensity by touching [+] or [-] on the Brightness/Contrast control bar.
Touch [X] on the Brightness/Contrast control bar to end adjustment.
Show Brightness/Contrast Control Bar
When the Brightness/Contrast control bar is not on the screen, changes the setting in Offline mode.
![]()
For details about the setting screen, refer to the setting guide.
![]() M.17.2.3 Main Unit - Display Settings
M.17.2.3 Main Unit - Display Settings
Go to Offline mode and touch [Main Unit] on the item changeover switch.
Touch [Display Settings].
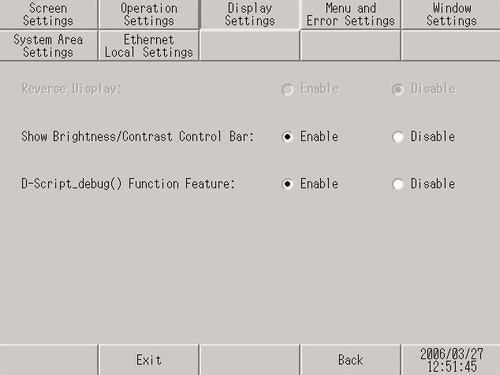
For the [Show Brightness/Contrast Control Bar], select [Enable].
Touch [Exit] to exit offline mode.