Keypads
This section describes how to configure the keypad that appears on display unit. You can set the desired language to use on the keypad.
Numeric Keypad Settings
To configure the numeric keypad settings:
- In Project Explorer window, go to [Screen Design] ➞ [Keypad] and click [System Numeric Keypad].
- In Properties window, go to
[Basic] tab and configure the below propertie(s):
Property
Description
[Layout]
Set the layout of the keypad.
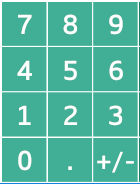
[Calculator]
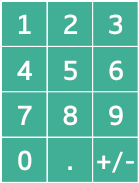 [Telephone]
[Font Type]
Select the desired language for the characters used on the keypad.
[Detect Keypad Touch]
Select the timing for when the keypad touch is detected.
[Click]
Touch the key then release, at which point the touch is detected.
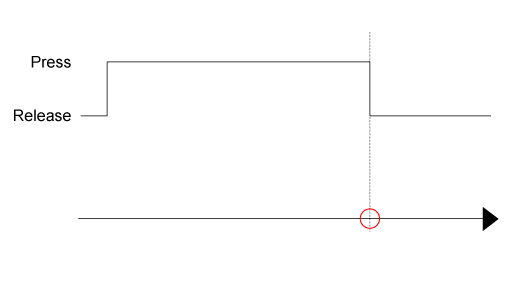
 : Detect touch
Press: Key is pressed
Release: Key is not pressed
- While the key is pressed and without releasing, if you move your finger outside the area of the key, the touch is canceled.
- While the key is pressed and any of the following occurs, the touch is canceled.
- Object does not display anymore due to a screen or content change.
- The interlock function is enabled on the object.
- The user logs out.
- Project file is transferred.
- Run time is shutdown.
- Run time is restarted.
- The Windows active window changes from the run-time application to a different application.
[Press]
Touch the key, at which point the touch is detected.
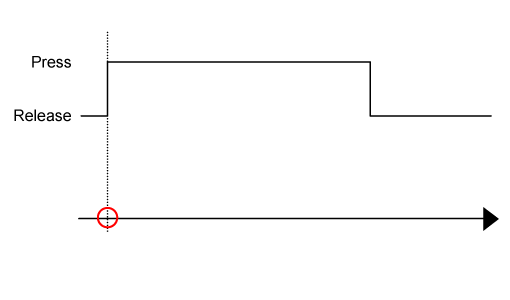 : Detect touch
Press: Key is pressed
Release: Key is not pressed
The remaining fields in the [System Numeric Keypad] settings are for defining labels of keys.
String Keypad Settings
To configure the string keypad settings:
- In Project Explorer window, go to [Screen Design] ➞ [Keypad] and click [System String Keypad].
- In Properties window, go to
[Basic] tab and configure the below propertie(s):
Property
Description
[Font Type]
Select the desired language for the characters used on the keypad.
[Detect Keypad Touch]
Select the timing for when the keypad touch is detected.
[Click]
Touch the key then release, at which point the touch is detected.
: Detect touchPress: Key is pressed
Release: Key is not pressed
- While the key is pressed and without releasing, if you move your finger outside the area of the key, the touch is canceled.
- While the key is pressed and any of the following occurs, the touch is canceled.
- Change screen or change contents causes the associated object to not display anymore.
- The associated object becomes interlocked.
- The user logs out.
- Project file is transferred.
- Run time is shutdown.
- Run time is restarted.
- The Windows active window changes from the run-time application to a different application.
[Press]
Touch the key, at which point the touch is detected.
: Detect touchPress: Key is pressed
Release: Key is not pressed
[Keypad Width]
Select the [Set Keypad Width] check box to specify the width (768...3840) of the [System String Keypad]. The keypad height is adjusted with respect to the keypad width.
If you set a keypad width greater than the screen width, during operation the keypad width is adjusted to fit the screen width.
The remaining fields in the [System String Keypad] settings are for defining labels of keys.
When you use the touch screen to enter text using a popup keypad and the entered text is less than the number of [Number of Bytes] of the selected variable, Null (0x00) will be stored in the remaining portion.
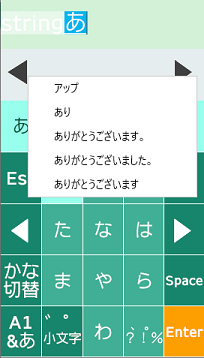
Microsoft IME Settings For Entering Japanese
When you type Japanese on the keypad on SP5000 Series Open Box (Windows 10 IoT Enterprise Model), IPC Series, or PC/AT, confirm the following Microsoft IME settings.
- Enable the Microsoft IME compatibility setting. If this setting is disabled, you cannot type Japanese on the keypad after changing the key layout from Hiragana to QWERTY. (This issue occurs on Windows 10 Version 2014 or later.)
- Disable predictive text setting. If this setting is
enabled, the prediction candidate popup prevents you from pressing
the keypad keys.
To change Microsoft IME settings:
- On the Windows task bar, type "IME"
in the search box, then click [Japanese IME settings] from the search
results.

- Click [General].
- For [Predictive Input], select [Off].
- From [Compatibility], enable [Use previous version of Microsoft IME].