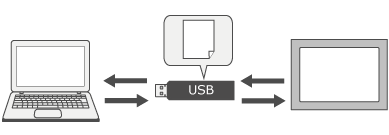
Exporting and Importing Security Data (User Information)
You can export to a binary file user information such as user names and passwords registered in screen editing software. Save the exported file to USB memory and import to the display unit.
You can also edit the exported file with the User Management Tool.
You can also export user information on the display unit to USB memory. Import the exported file into the screen editing software.
You can also use the User Management Tool to modify the exported file.
Export from the Screen Editing Software
- In the [Project Explorer], select [Security] ➞ [Setting], and click [Export].
- Define the location and file name.
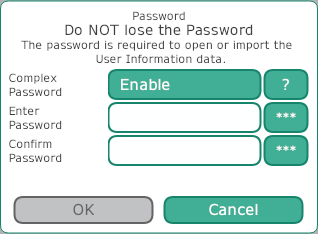
- Enter the password. This password is used for importing and modifying
user information.

Password conditions are as follows:
- When [Complex Password] is set to [Enable]
Passwords must be from 8 to 100 characters long with at least 1 lower case character (a-z), 1 upper case character (A-Z), 1 number (0-9), and 1 special character.
Available Special CharactersSpecial Characters !
) ;
] "
* <
^ #
+
=
_ $
,
>
` (Grave accent) %
-
?
{ &
.
@ | ' (apostrophe)
/
[ } (
:
\ ~ - When [Complex Password] is set to [Disable]
Passwords must be from 3 to 100 characters long.
You cannot configure the [Complex Password] setting here. Use screen editing software to configure this setting. From the [Project Explorer] window, go to [Security] ➞ [Settings], and in the Properties window configure [Complex Password].
Import to the Screen Editing Software
- From the screen editing software, open the project with the user information you want to modify.
- In the [Project Explorer], select [Security] ➞ [Setting], and click [Import].
- Select the file to import.
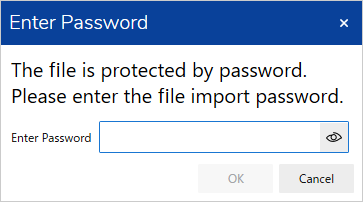
- Enter the password. The project user information is overwritten.
Export from the Display Unit
The following is the operation when a switch set up with an export operation is drawn on the screen.
- On the screen, touch the export switch.
Set up the [Security] - [Export] operation on the switch.
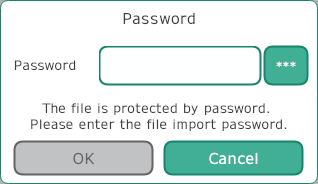
Security - Enter the password. A file is created in USB memory. (UserManagement\data.db)
In the middle of exporting or importing the user information file, if you execute one of the [Security] operations [Login], [Import], or [Export], the operation will fail.
Password conditions are as follows:
- When [Complex Password] is set to [Enable]
Passwords must be from 8 to 100 characters long with at least 1 lower case character (a-z), 1 upper case character (A-Z), 1 number (0-9), and 1 special character.
Available Special CharactersSpecial Characters !
) ;
] "
* <
^ #
+
=
_ $
,
>
` (Grave accent) %
-
?
{ &
.
@ | ' (apostrophe)
/
[ } (
:
\ ~ - When [Complex Password] is set to [Disable]
Passwords must be from 3 to 100 characters long.
You cannot configure the [Complex Password] setting here. Use screen editing software to configure this setting. From the [Project Explorer] window, go to [Security] ➞ [Settings], and in the Properties window configure [Complex Password].
Error Message
| Error Message | Cause |
| Insufficient password strength. | Password conditions are not satisfied. |
| The password and confirmation password do not match. | Passwords do not match between [Enter Password] and [Confirm Password]. |
| Cannot create the file of Security Data. |
|
| The file of Security Data is read only. | UserManagement folder on USB storage and is set to read-only so it cannot be overwritten. |
Import to the Display Unit
- Stored in USB memory's "UserManagement" folder, data.db is the only file you can import.
- Import will fail in the following cases:
User Group information does not match project settings.
Even though [Complex Password] is set to [Enable] in the project settings, [Complex Password] is set to [Disable] in the user information file.
Even though the Transfer [Security Setting] is set to [Enable] in the project settings, the user information file does not have a user with a security level higher than the Transfer [Security Level].
Even though the OPC UA Server [Security Setting] is set to [Enable] in the project settings, the user information file does not have a user with a security level higher than the OPC UA Server [Security Level for Browse].
Even though [Display Hardware Configuration] is set to [Enable] in the project settings, the user information file does not have a user with a security level higher than the Display Hardware Configuration [Security Level].
When import is executed, the password’s last update date in the project file is set to the date of the import. This results in extending the password expiration date.
The following is the operation when a switch set up with an import operation is drawn on the screen.
- On the screen, touch the import switch.
Set up the [Security] - [Import] operation on the switch.
Security - Enter the password. On the display unit, the project user information is overwritten.
In the middle of exporting or importing the user information file, if you execute one of the [Security] operations [Login], [Import], or [Export], the operation will fail.
Error Message
| Error Message | Cause |
| Cannot find the file [filename]. |
|
| Import failed. Either the file is incorrect or the password is invalid. |
|
| Import failed. User information does not match the project settings. | User information file has one or more of the following issues.
|
| Import failed. Cannot write data to this product. | There is either insufficient free space on the drive where Runtime is installed, or some other reason for the write error. |
Modifying User Information with the User Management Tool
Modify the exported file with the User Management Tool.
- Start up the User Management
Tool.
This tool is installed in the following path:
Start Menu > BLUE *.* > BLUE *.* User Management Tool
- From the User Management Tool, click [Open] and select the file.
- Enter the file password when it was exported.
- Make your modifications, such as adding users and updating passwords,
and click [Save].
Click [Show Password] to display the password characters when typing. To prevent password leakage, this function cannot be applied to previously entered passwords.
- This tool can be distributed from BLUE installation media ([\Tools] folder).
- Each user group can have a maximum 200 users. If the limit on the number of users in a user group is exceeded, exporting user information from the User Management Tool will display an error message.
- The number of users that can be registered to a user group varies depending on the model of the display unit. For information on the number of users you can register, refer to the following.
Support Model/Feature List
Error Message
| Error Message | Cause |
| Failed to open the file. |
|
| Format is invalid. Enter a valid file format. | Imported user information file format is a previous format supported by Version 3.1 Service Pack 1B or earlier. |
| Failed to save file. Reached maximum number of users in user group '(User Group Name)'. | Exceeded the limit on the number of users in a user group. Each user group can have a maximum 200 users. |
| Failed to create a temporary file. | Internal data inconsistency. |