Transferring a Project for The First Time
- When Using SP5000 Series Power Box, SP5000X Series, or GP-4100 Series
- When Using SP5000 Series Open Box (Windows 10 IoT Enterprise Model)
- When Using ST6000 Series or STM6000 Series (Except STM-6B00D)
- When Using STM-6B00D
- When Using IPC Series or PC/AT
When Using SP5000 Series Power Box, SP5000X Series, or GP-4100 Series
By factory default, the GP-Pro EX system is installed. The GP-Pro EX system is converted to BLUE when a BLUE project file is transferred.
The following transfer methods are supported. For procedures on each transfer method, refer to the corresponding link.
Transferring a Project over an USB Cable
Transferring a Project over Ethernet
- Once you transfer a BLUE project file to a display unit, you cannot revert the display unit back to run GP-Pro EX project files.
- For SP-5B10 and SP-5700WCD or SP-5B10 and SP-5800WCD, when you transfer the first project file over Ethernet, use the IP address shown on the display unit screen.
- If the GP-Pro EX run-time version is 4.09.200 or later and the connection key is enabled, the BLUE project file cannot be transferred. From the GP-Pro EX offline screen, clear the [Authenticate connection key when transferring] check box before transferring the BLUE project file.
When Using SP5000 Series Open Box (Windows 10 IoT Enterprise Model)
The runtime application (BLUE Runtime) is installed as the factory default.
The runtime application must be enabled before transferring a project.
To enable the runtime application:
Turn on the display unit.
Double click the shortcut [Convert Runtime] on the desktop.
- From the [Confirmation] dialog box, click [OK].
After rebooting, a pre-installed configuration screen (Welcome Screen) is displayed.
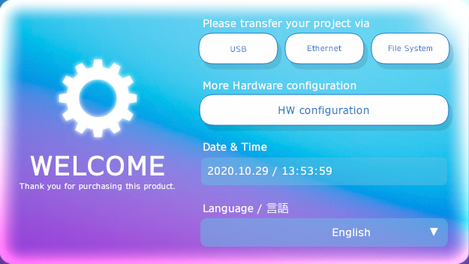
- Touch the [HW configuration] button.

- Touch the [Shutdown] button.

- Restart
the runtime application with administrator privileges. From the Program
menu, click [BLUE Runtime] > [BLUE Runtime (Run as Administrator)].
- Touch the button for the corresponding transfer option.

- Follow the instructions on the screen to transfer the project file.
When Using ST6000 Series or STM6000 Series (Except STM-6B00D)
By factory default, this model has a pre-installed configuration screen (Welcome Screen) for project file transfers and network connections.
After turning on the power, the Welcome Screen is displayed.
When Using STM-6B00D
By factory default, this model has a pre-installed configuration screen (Welcome Screen) for project file transfers and network connections, but you cannot use the Welcome Screen because this model does not have a display module.
Factory Settings
Use the following factory default settings to transfer a project file.
| Setting | Setting Value | |
| Pro-face Connect | Enable | |
| Web Viewer | Activated | |
| Ethernet Download | Enable | |
| Ethernet 1 | IP Address | 192.168.219.81 |
| Subnet Mask | 255.255.255.252 | |
| Ethernet 2 | IP Address | 192.168.220.81 |
| Subnet Mask | 255.255.255.252 | |
Supported Transfer Options
When transferring a project to this model, the following transfer methods are supported.
- Transferring a Project over an USB Cable
- Transferring a Project over Ethernet
- Transferring a Project with the File System
Transferring a Project over an USB Cable
For the procedure on this transfer method, refer to the following link.
Transferring a Project over an USB Cable
Transferring a Project over Ethernet
When connecting the PC and this model using Ethernet Cable, modify the IP addresses on the PC as follows.
Ethernet port used on this model side |
PC IP Address |
| Ethernet 1 port | 192.168.219.82 |
| Ethernet 2 port | 192.168.220.82 |
For the procedure on this transfer method, refer to the following link.
Transferring a Project over Ethernet
- To transfer a project file without using a screen, [Ethernet Download] is enabled by factory default. We recommend disabling [Ethernet Download] for normal operations. [Ethernet Download] is overridden by the [Always Allow Ethernet Transfer] setting in a transferred project. By default, [Always Allow Ethernet Transfer] is disabled. Once [Ethernet Download] is overridden and disabled, the Web Viewer application is required for screen operations when transferring a project via Ethernet.
- When transferring a project over Ethernet, connect this model and PC in a one-to-one connection.
Transferring a Project with the File System
When transferring a project with the file system, you need to use Welcome Screen.
You can operate the Welcome Screen from a Web Viewer client. For more information about Web Viewer, refer to the following.
BLUE Web Viewer Overview and Development Workflow
- To operate the Welcome Screen from a Web Viewer client, the Web Viewer [Security Setting] is disabled by factory default. We recommend enabling [Security Setting] in normal operations. [Security Setting] is overridden by the setting in a transferred project. By default, [Security Setting] is enabled.
- Welcome Screen operation needs to be a one-to-one connection between this model and Web Viewer client.
When connecting from a client, enter the following URL in your web browser.
| Ethernet Port | URL |
| Ethernet 1 | http://192.168.219.81:8082/webviewer/index.html |
| Ethernet 2 | http://192.168.220.81:8082/webviewer/index.html |
For the procedure on this transfer method, refer to the following link.
Transferring a Project with the File System
When Using IPC Series or PC/AT
The runtime application (BLUE Runtime) must be installed before transferring a project. For information about installation, see the following.
After installation, start the runtime application with administrator rights.
- From the Program menu, right-click [BLUE
Runtime] and select [Run as administrator].
If you cannot select [Run as administrator], please contact your system administrator.
- Touch the button for the corresponding transfer option.
- Follow the instructions on the screen to transfer the project file.
Manually Setting Communication Permission
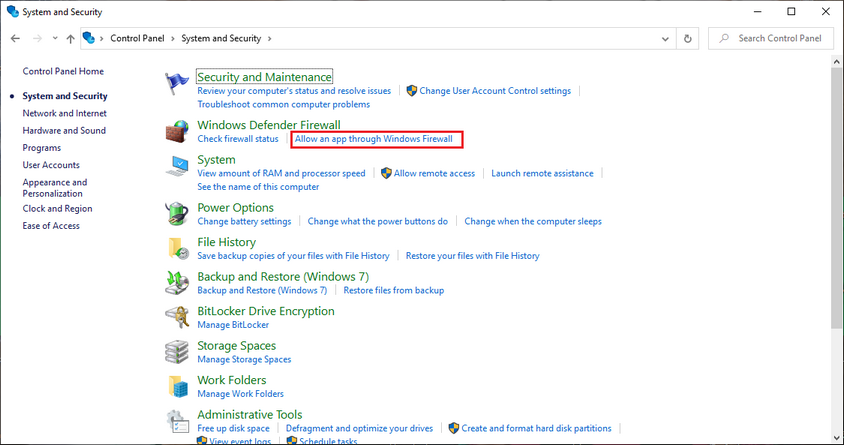
Before transferring a project file over Ethernet, configure the communication permission settings.
- From the Windows [Control Panel] window, select
[System and Security]→[Allow an app through Windows firewall].
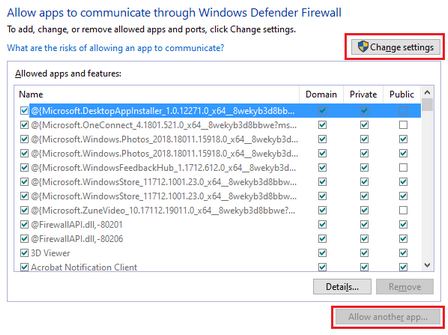
- Click [Change settings]→[Allow another app].
- Click [Browse], and select the following exe
file. After the exe file is selected, click [Add] and the exe file
is added to the [Allowed apps and features] list. Perform this operation
one at a time.
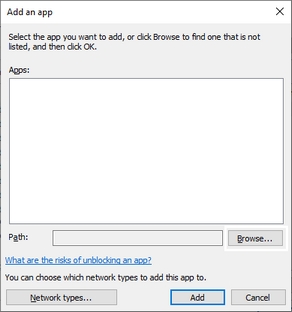
(Runtime Application installation folder)\BLUE Runtime\RTPrimaryBoot\TransferService.exe
(Runtime Application installation folder)\BLUE Runtime\Bin\ITargetManager.exe - For each added exe file, set its network profile
by selecting or clearing the Private/Public/Domain check boxes.
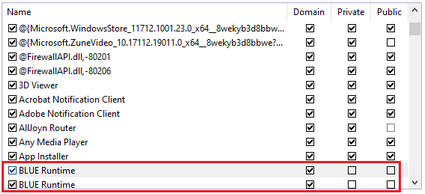
Click [OK].